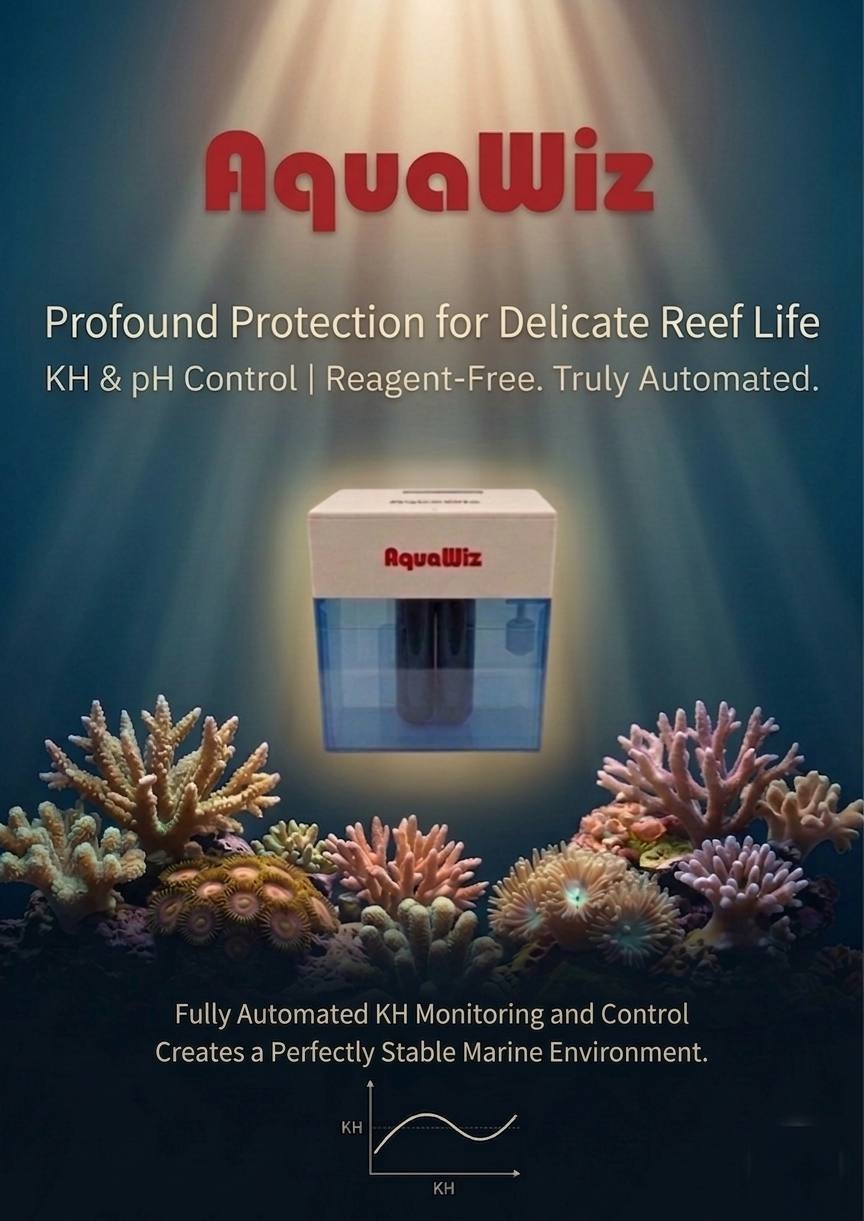
AquaWiz KH Controller™ User Manual (5th Generation)
⚡ Quick Start Guide
🔧 First-Time Setup
- Install the device and confirm all tubing is connected correctly
- Power on and connect to Wi-Fi
- Wait 24 hours before running the first KH calibration
- Complete the KH calibration using a reliable test kit
🔄 Operation Overview
- The device measures automatically once per hour (24/7 operation)
- The system calculates and executes dosing based on the difference between current KH and target KH
- Dosing usually occurs between minutes 23–27 of each hour
🔍 A6 Stage Check (Important)
During A6 (the aeration stage), please confirm:
- Water levels in the left and right test tubes are below the marked line
- Bubbles on both sides are even and sufficient
💧 Dosing Safety Recommendation
⚠️ The hourly maximum dose should not exceed the amount required to raise KH by 0.1 dKH. Avoid rapid correction to minimize water-parameter swings.
🚰 Top-up / Maintenance Tip
💡 After topping up the reference water, the next measurement may show a slight deviation (this is normal). It is recommended to run KH calibration again 1 hour later.
✅ Usage Recommendations
- Keeping the reference KH value as close to your target KH as possible reduces long-term drift and improves system stability
- KH calibration frequency: Once a week for the first two weeks after installation, then extend to once a month
1. Product Introduction
The AquaWiz KH Controller™ is a patented innovation that automatically measures the KH level of your aquarium and controls a built-in dosing pump to supplement KH. A single measurement takes approximately 20 minutes.
All you need to prepare is "reference seawater" — this can be natural seawater, water from your existing aquarium, or synthetic saltwater mixed from salt mix, as long as the KH value is close to your aquarium water.
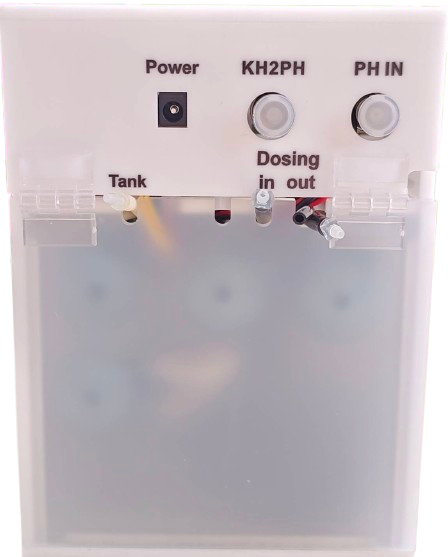
2. Exterior Description
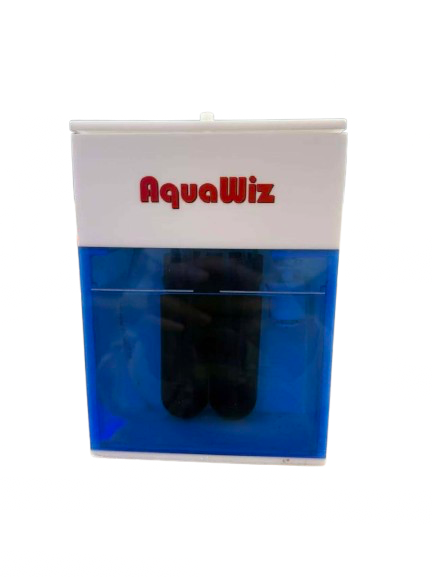

- Inside the Top Cover: Control circuit board and pumps
- Buttons: Three buttons, from left to right:[Minus/Left],[Plus/Middle],[Enter/Select]
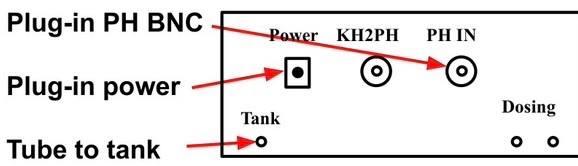
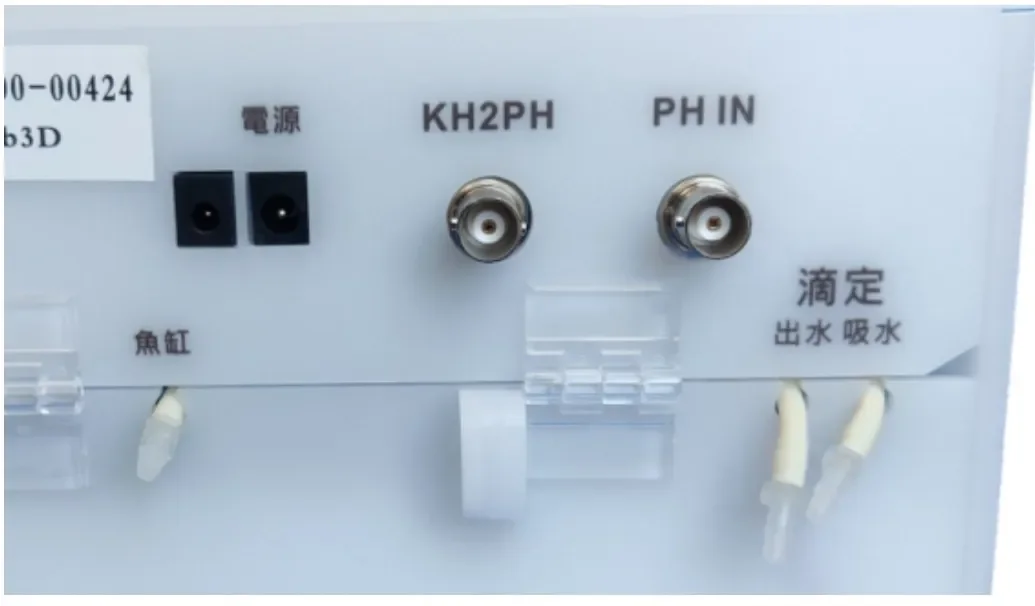
- pH Electrode (PH IN): Compatible with all aquarium pH electrodes
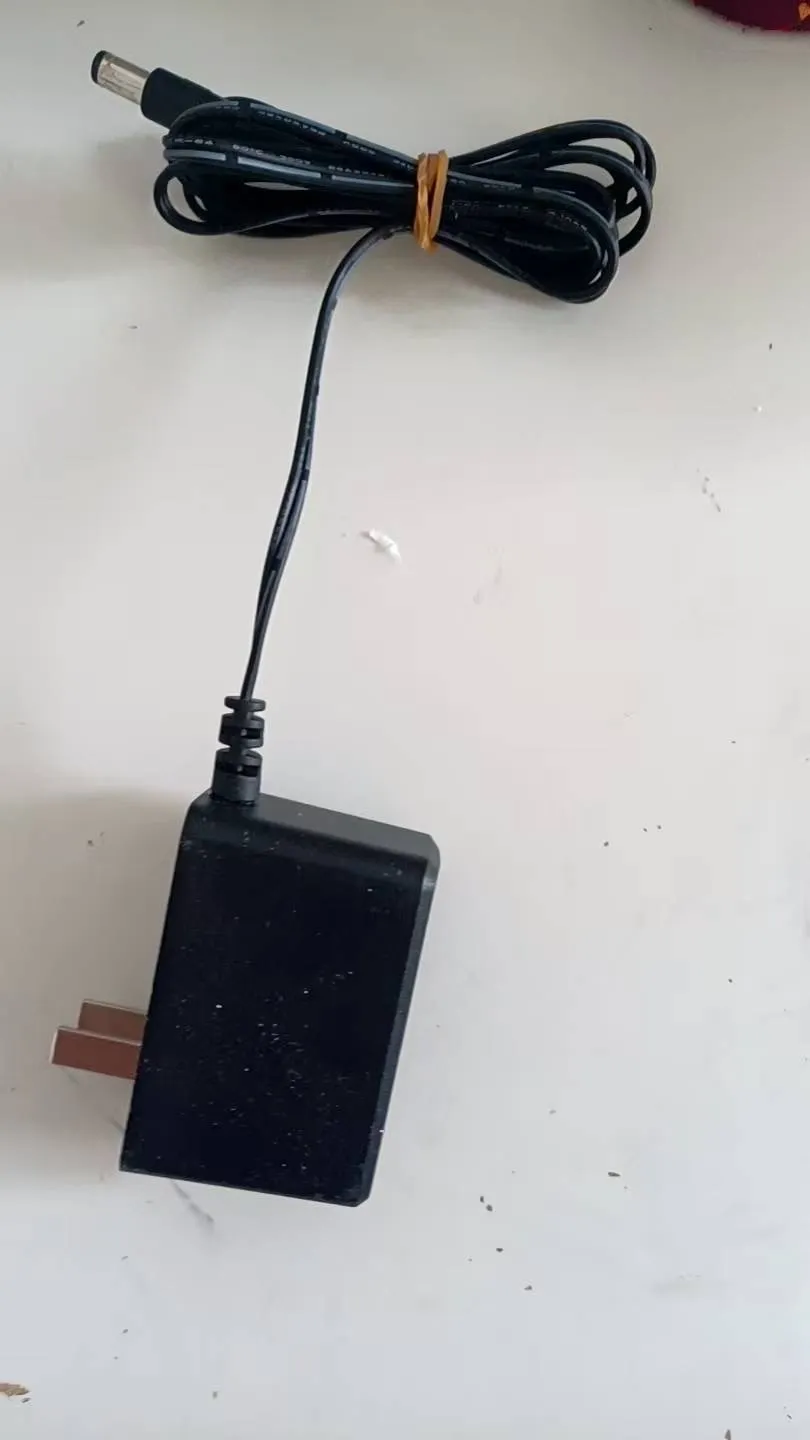
- 12V Power Input: 12V 1A power supply
- Dosing Outlet/Inlet: The inlet draws sodium bicarbonate solution or KH supplement; the outlet delivers KH solution to the aquarium. When KH is below the target value, it supplements precisely the amount needed.
- KH to PH Output (KH2PH) BNC Socket: Can be used with Apex, eKoral, or pH monitors to display KH values
- Aquarium Water Inlet/Outlet Tubing (Connected to Tank): Placed in the sump or aquarium, self-priming, used to measure aquarium KH
- Reference Seawater Placement
3. Preparation & Important Notes
⚠️ Place the device above the sump to prevent siphoning.
- It is recommended to place the device in a dry cabinet to reduce salt spray, minimize air pump noise, and reduce airflow interference
- Seawater has high conductivity — electrical leakage or magnetic fields from the aquarium may affect pH and KH measurements. Mr.Aqua UV sterilizers have been verified to not affect measurements.
- An internet connection is required for downloading settings from the website to the device and for uploading hourly measurement data to the website
- Without internet, the device can still perform measurements and dosing based on previously stored settings, but cannot upload data or download new settings
How to change settings temporarily without internet:Enable your phone's hotspot, connect KHA to the hotspot, change settings on the website, select[Sync]on the KHA to download settings, then you can turn off the hotspot.
⚠️ When offline, hourly KH data cannot be uploaded and will be lost. Data will not be retroactively uploaded after reconnecting.
4. Installation Steps
- Place Horizontally: Precise leveling is not required, but place as close to the aquarium or sump as possible.
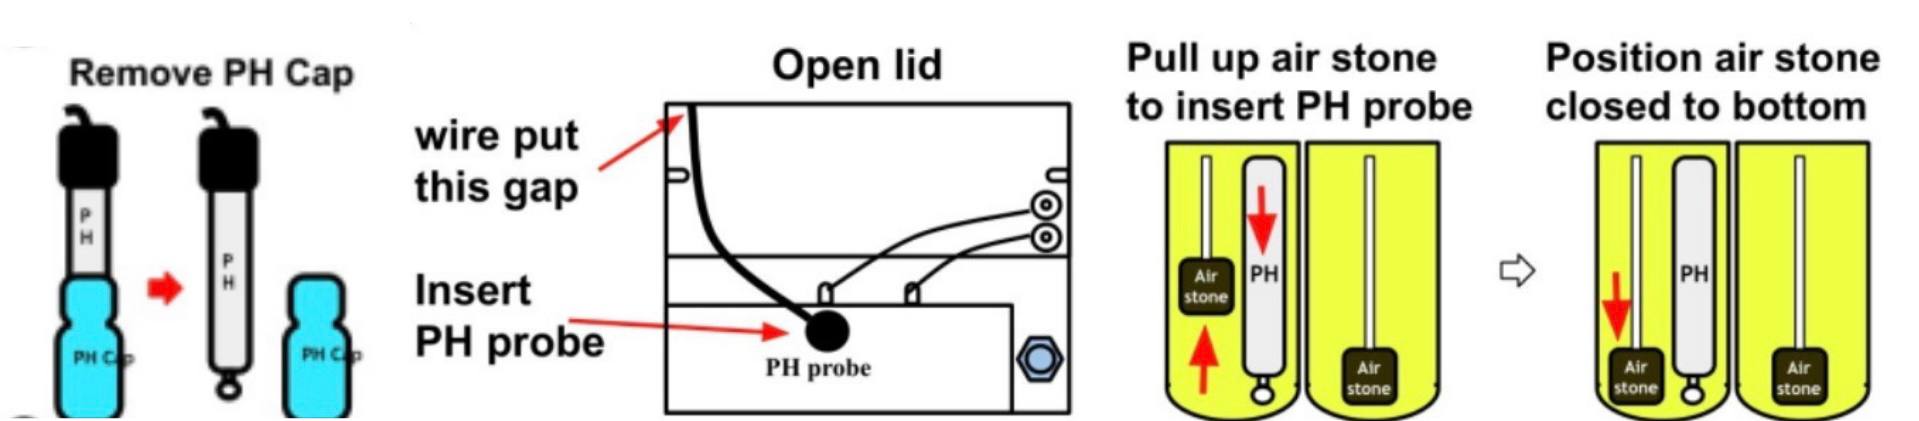
- Install the pH ElectrodeRemove the storage cap from the pH electrode and check whether the glass bulb is cracked or the electrolyte has leakedOpen the top cover and gently insert the electrode into the left test tube opening. You may lift the left air stone first to prevent it from obstructing the pH probeThe glass bulb should be approximately 0.5 cm above the bottom of the test tube to avoid crackingScrew the electrode's BNC plug into the rear BNC socket, close the top cover, and tighten the thumbscrewsWait 3 minutes after inserting the electrode. During step A6,LF 100displayed on the LCD indicates normal operation;LF 0orFailindicates a faulty electrode — please replace itThe electrode lifespan shown on the website updates only once per hour. Do not use it to judge whether a newly installed electrode is working properly.
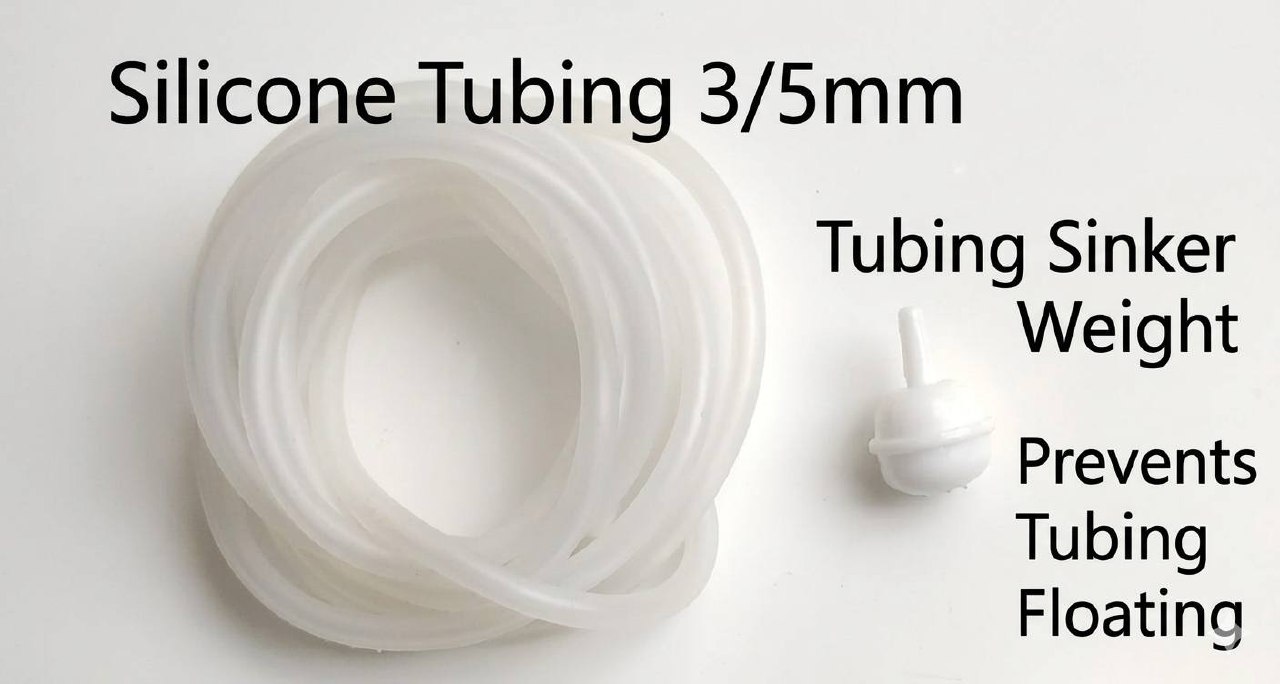
- Attach the Sinker and Connect the Water Inlet to the Sump or AquariumThe left water tube connector on the back is the seawater inlet/outlet. We recommend using silicone tubing with 3/5mm inner/outer diameter. Keep the tubing as short as possible to reduce pump running timePlace the calcium reactor or KH dosing outlet near the main pump area of the sump. Place the KHA water inlet with the included sinker in the drain section of the sump to avoid drawing in high-KH waterEnsure the tube ends remain submerged — use the included sinker to keep the tubing underwater. Do not place them in areas with bottom sludge or sediment
- Plug In: Connect the 12V power supply to the KH controller. The device will power on automatically.
- Remove the storage cap from the pH electrode and check whether the glass bulb is cracked or the electrolyte has leaked
- Open the top cover and gently insert the electrode into the left test tube opening. You may lift the left air stone first to prevent it from obstructing the pH probe
- The glass bulb should be approximately 0.5 cm above the bottom of the test tube to avoid cracking
- Screw the electrode's BNC plug into the rear BNC socket, close the top cover, and tighten the thumbscrews
- Wait 3 minutes after inserting the electrode. During step A6,LF 100displayed on the LCD indicates normal operation;LF 0orFailindicates a faulty electrode — please replace it
The electrode lifespan shown on the website updates only once per hour. Do not use it to judge whether a newly installed electrode is working properly.
- The left water tube connector on the back is the seawater inlet/outlet. We recommend using silicone tubing with 3/5mm inner/outer diameter. Keep the tubing as short as possible to reduce pump running time
- Place the calcium reactor or KH dosing outlet near the main pump area of the sump. Place the KHA water inlet with the included sinker in the drain section of the sump to avoid drawing in high-KH water
- Ensure the tube ends remain submerged — use the included sinker to keep the tubing underwater. Do not place them in areas with bottom sludge or sediment
⚠️ Do not connect the KH dosing tubing yet. Wait until KH measurements have stabilized (approximately 3 days), KH calibration is complete, and all [KH Dosing] parameters have been correctly set on the website. Initially, do not dose directly into the aquarium — use a container to verify dosing accuracy first, then connect to the aquarium once confirmed.
5. Power On
After powering on, the device automatically tests all pumps (forward and reverse rotation), then enters the settings menu. If no input is made within 30 seconds, it automatically begins the KH measurement process. Press any key to re-enter the settings menu.
Settings Menu Screen
Input method: Three buttons, from left to right: [Minus/Left], [Plus/Middle], [Enter]
6. 📶 Wi-Fi Connection & Initial Setup Guide
Follow these steps to complete device connection and initial setup:
📌 Step 1 — Power On & Enter Wi-Fi Mode
- Plug in the power supply and turn on the device
- Once the main screen appears, select "WIFI"
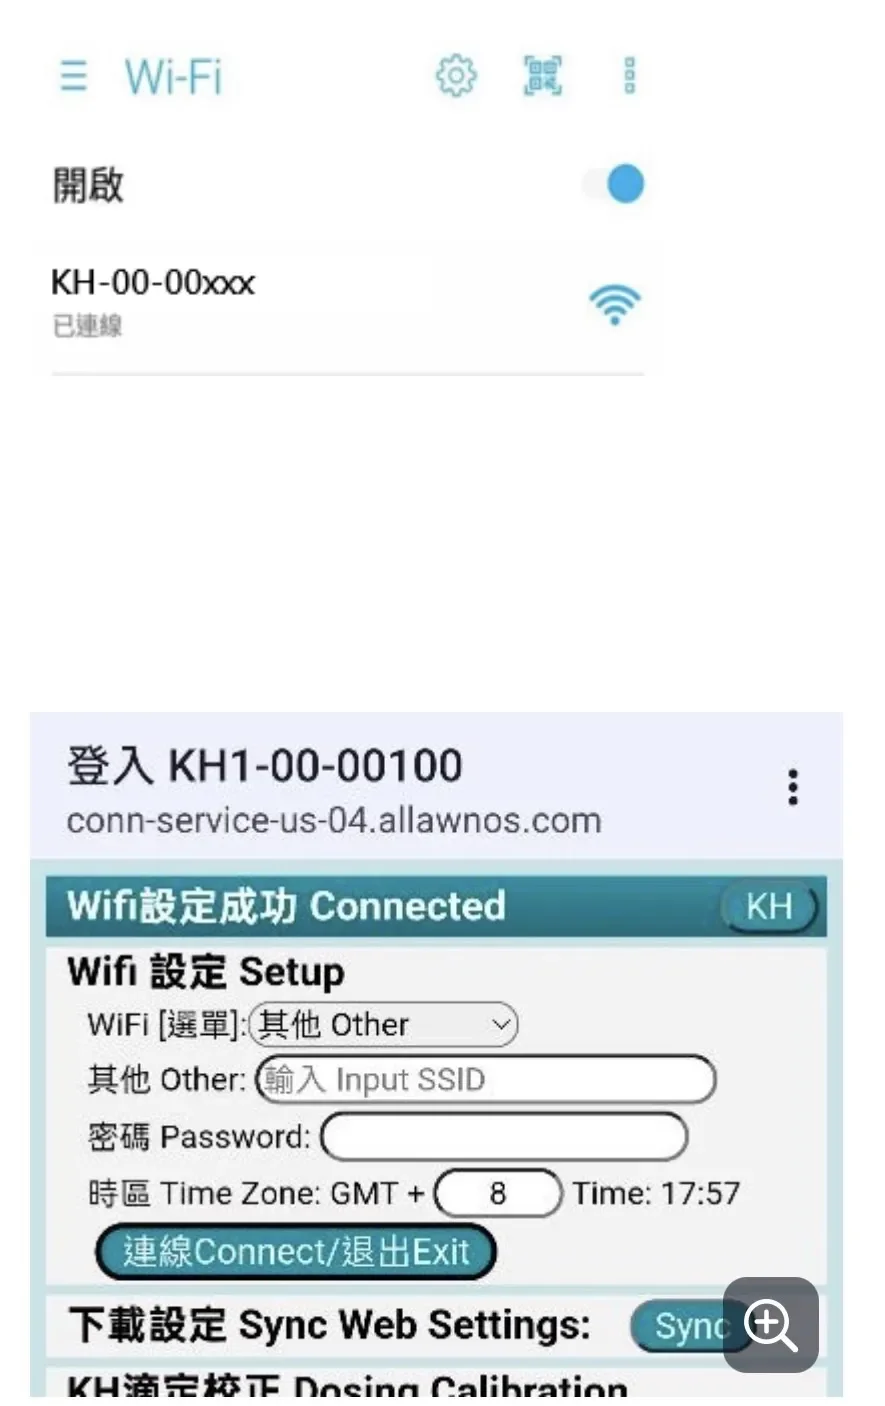
📌 Step 2 — Connect Your Phone to the Device
- Open your phone's Wi-Fi settings
- Find the device's signal (starts with "AquaWiz") and tap to connect
- Enter password:1234567890
👉 Once connected, the setup page will appear automatically.
⚠️ ⚠️ If the page does not appear automatically, open your browser and navigate to:192.168.4.1
📌 Step 3 — Configure Your Home Wi-Fi
On the setup page:
- Select your2.4GHz Wi-Fi SSIDfrom the list at the top
- Enter your Wi-Fi password
- Check the box: "Auto-fill water chamber on first install"
- Tap "Connect"
📌 Step 4 — Connection Complete & Initialization
After setup is complete:
- The device screen will display "Success" → connection established
- The screen will show your home Wi-Fi SSID and password
- The device will automatically begin filling the water chamber, displaying: "Water In"
⏱ Approximately 20 minutes to complete initialization.
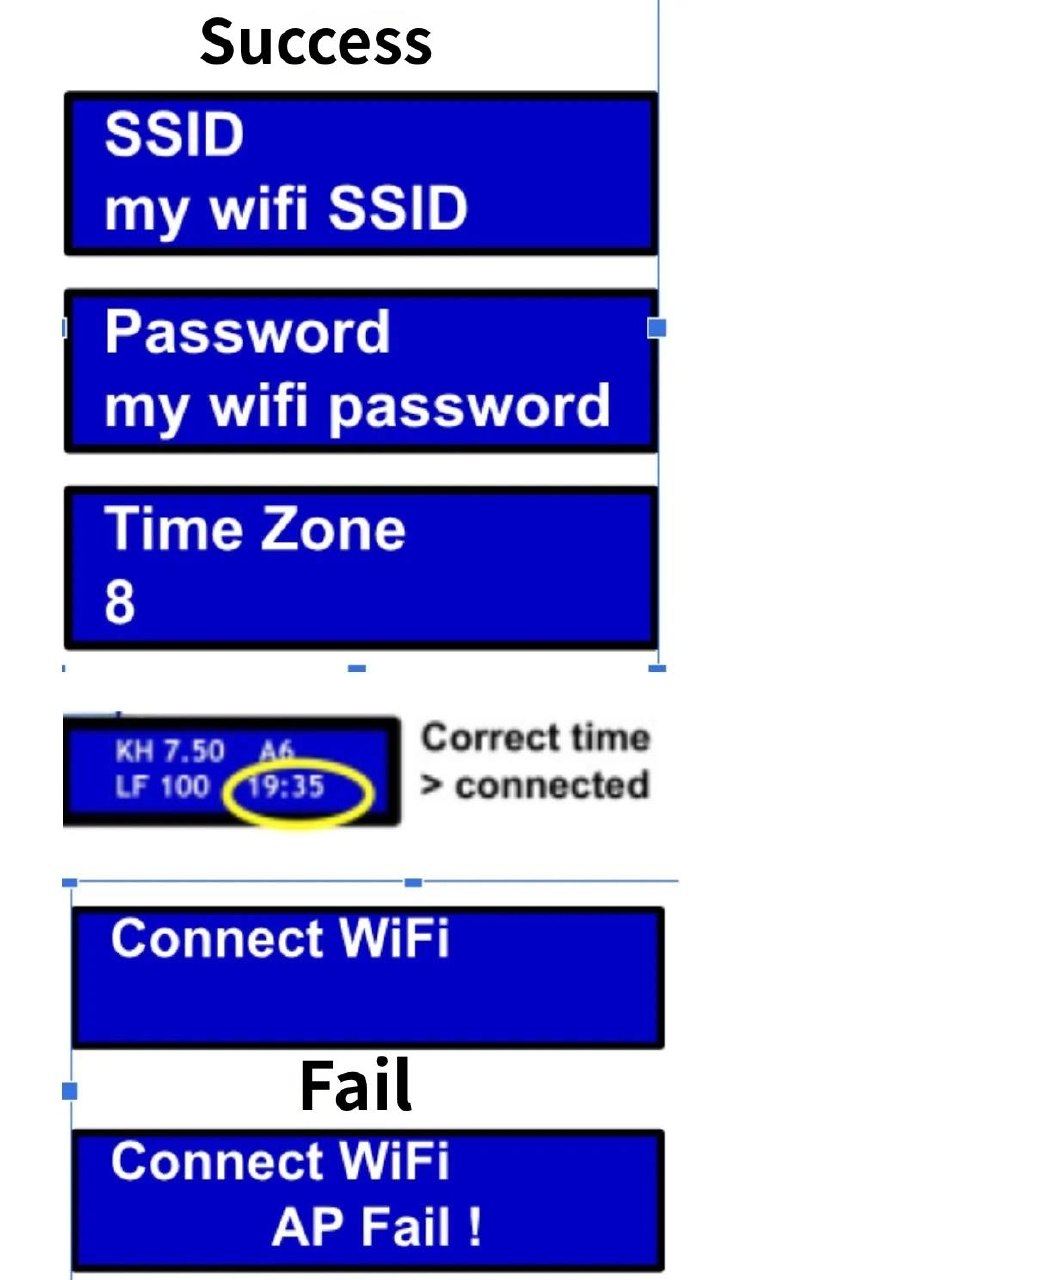
If "Success" does not appear after connecting:
• WiFi not found → The network is not 2.4GHz / SSID contains non-English characters / router not supported
• AP fail → Incorrect WiFi password, please try again
📺 Local Monitoring Mode
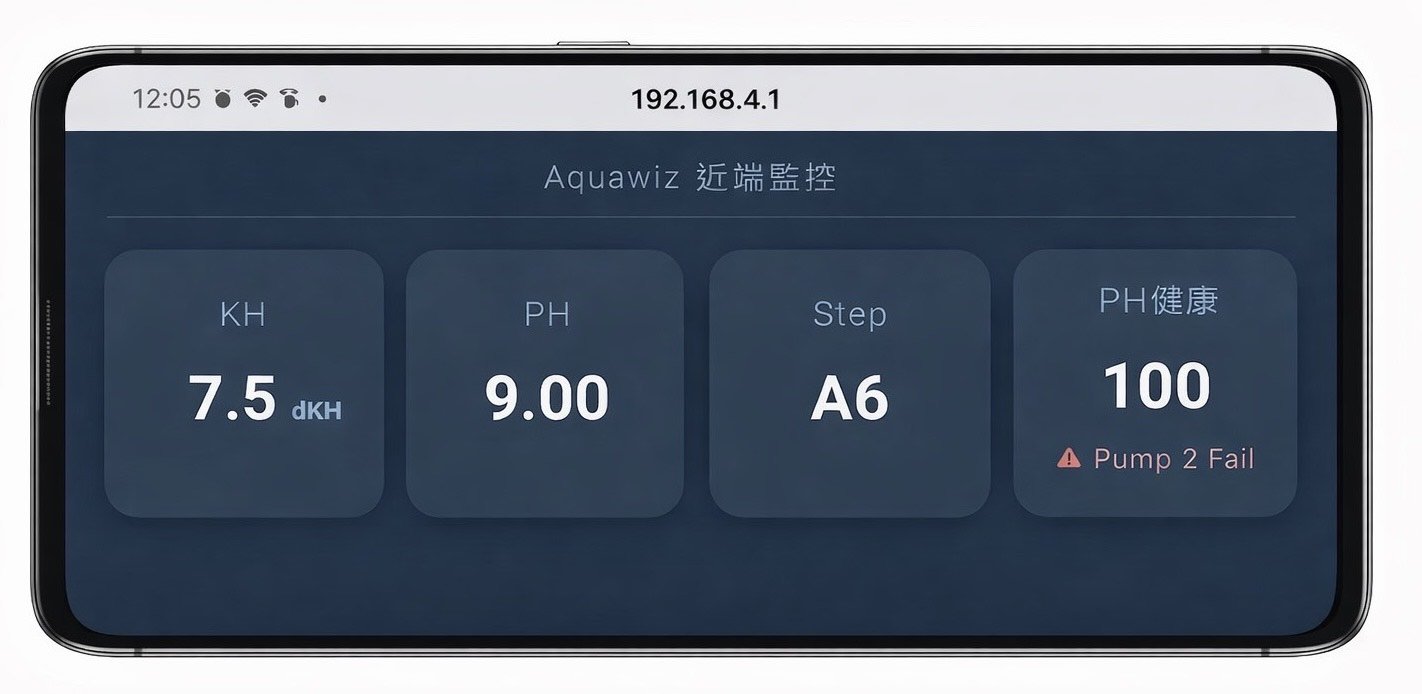
⚠️ ⚠️ Important NoticeIf you connect your phone directly to the device's Wi-Fi signalwithoutfirst tapping "WIFI" on the main screen:👉 You willnotenter the setup page👉 You will enter "Local Monitoring Mode" instead
📺 What is Local Monitoring Mode?
In this mode, you can:
- Use a phone, tablet, or display
- View real-time device data (KH / pH)
- Observe the current operation step
👉 Perfect for placing near your aquarium as a live monitoring dashboard.
🔧 How to Access the Setup Page?
👉 You must first tap "WIFI" on the device's main screen, then connect your phone to the device.
💡 💡 Reminders• Make sure you are using a 2.4GHz Wi-Fi network• For first-time installation, always check "Auto-fill water chamber"• If connection fails, re-enter WIFI mode on the device and try again
Automatically Drawing Aquarium Water as Reference Seawater
If you did not check the "Auto-fill water chamber on first install" option during WiFi setup, you can fill the water chamber manually:
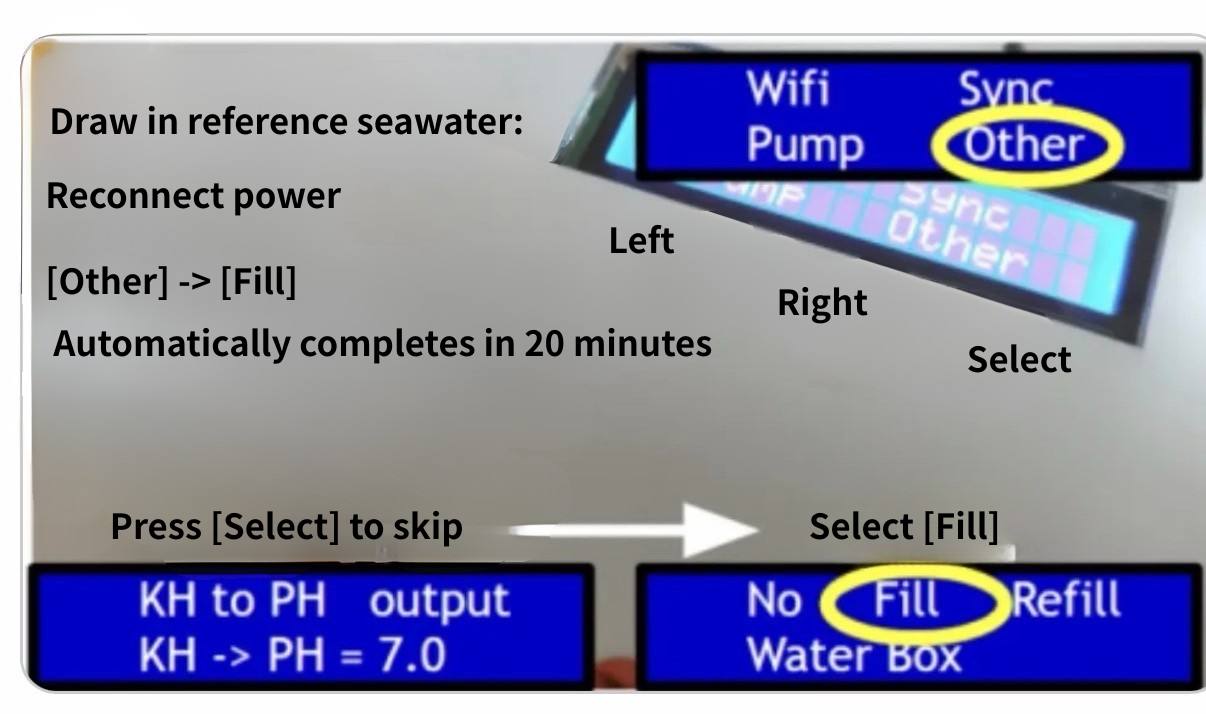
Select [Other] from the menu, press the Select button to skip [KH to PH output] setup, then select [Fill] to automatically fill the water chamber to the marked level. After completion, the measurement process begins automatically. This takes approximately 20 minutes.
To replace the water, select [Refill] — the device will automatically drain and refill, taking approximately 40 minutes. The measurement process begins automatically after completion.
7. Automatic KH Measurement Process
After the water chamber is filled, or after 30 seconds of inactivity in the settings menu, the KH measurement process begins automatically.
LCD Screen Display Guide

| Display | Description |
|---|
KH | Aquarium KH value — first reading appears after approximately 20–40 minutes |
PH | Aquarium pH value |
LF 100 | pH electrode lifespan 100% (normal). Wait approximately 3 minutes after replacing the probe |
LF 0 / Fail | Electrode aged or not inserted — please replace |
A6 | Current measurement step (Step 6) |
19:35 | Network-synced current time — correct time indicates normal connection |
L / H | Water level slightly low / slightly high — auto-adjusts over several hours; no display = level is correct |
Rep | Difference from previous measurement exceeds 0.2 — re-measuring once |
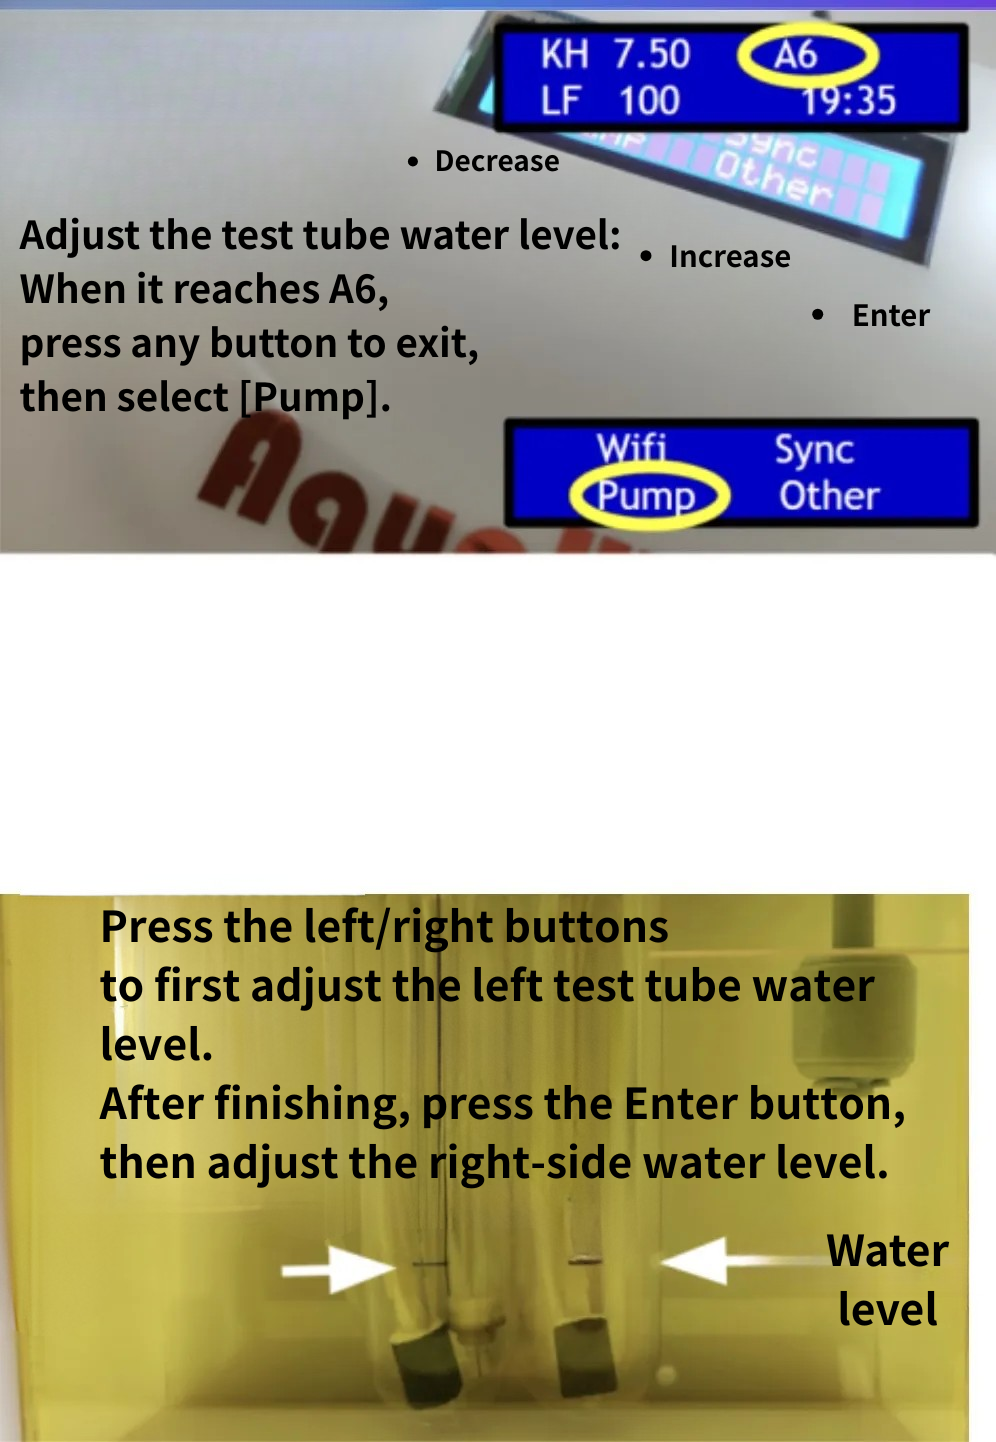
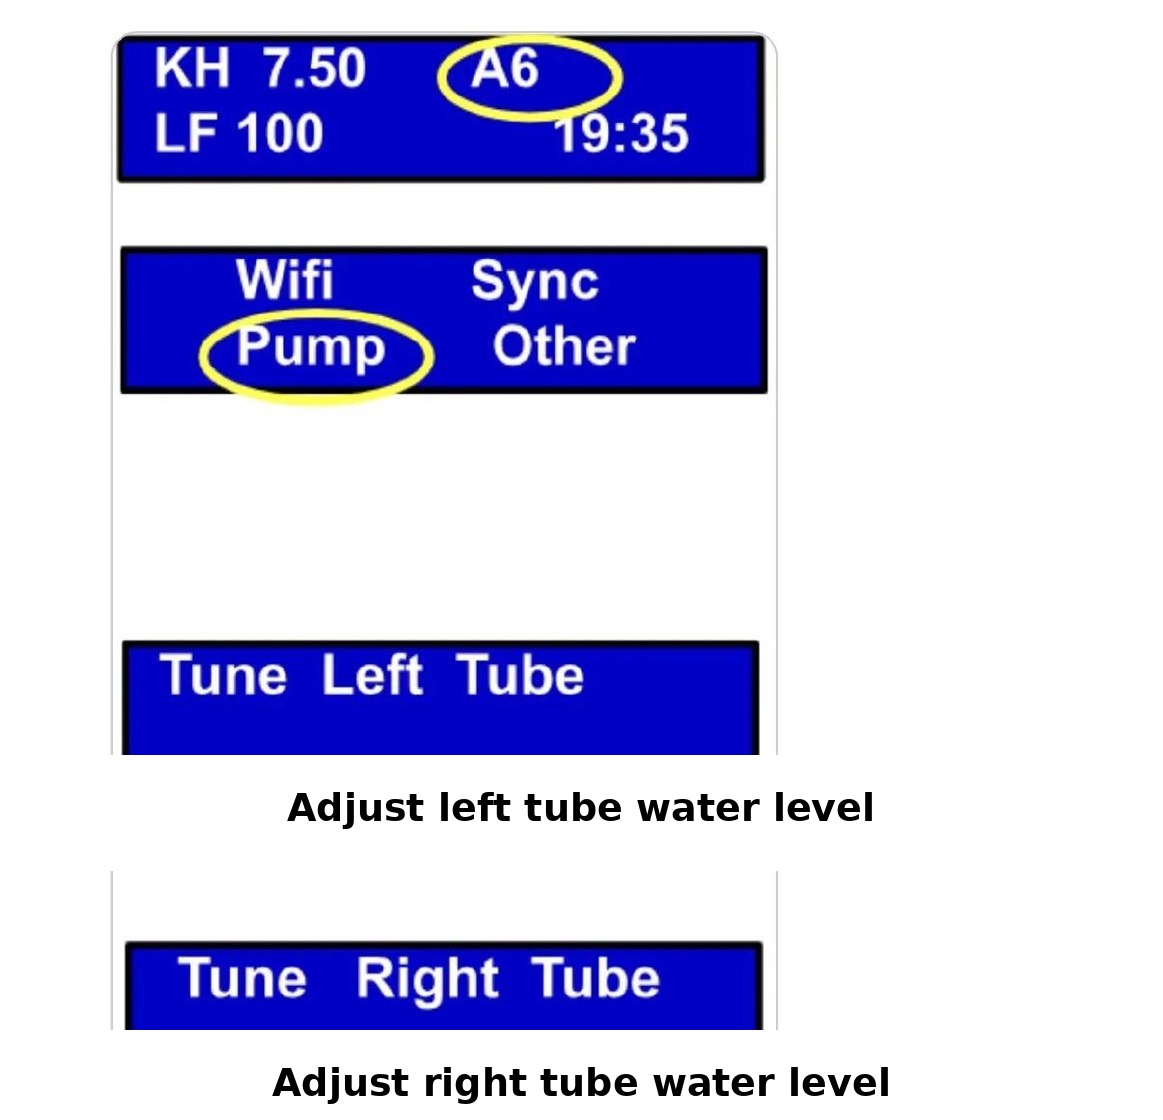
8. Test Tube Water Level Calibration (Pump) — Required During Initial Setup
Follow these steps to adjust the test tube water levels (adjustments can only be made during step A6):
Quickly Entering A6
If the device is not currently at A6, unplug the power and plug it back in. Wait approximately 3 minutes and the device will automatically enter A6.
Two adjustment methods are available:
Method 1: Adjust via Device Buttons
- During step A6, press any key to return to the main screen
- Select Pump
- When "Left Tube Level" appears → use the left and middle buttons to adjust the left tube water level to the marked line, then press Enter
- When "Right Tube Level" appears → adjust the right tube water level the same way, then press Enter
- When "Calibration" appears → select No
- Continue pressing No to return to the main screen

Method 2: Adjust via WiFi Configuration Page
- While the device is at A6, go to your phone's WiFi settings
- Find the device's signal (SSID) and enter the password: 1234567890
- On the configuration page, scroll down to find the test tube water level adjustment option
- Use +/- to adjust both test tubes to the marked line
- Exit when done
Reference Video
See this video for guidance: https://youtube.com/shorts/dTKo_hoY2Ow
⚠️ ⚠️ Important RemindersTest tube water levels are only at the marked line during A6 — water levels fluctuate during other steps, which is normalNormally, you only need to calibrate once — the device remembers the water level settingAfter calibration, observe whether the bubble volume is even on both sides. If one side has larger bubbles than the other, open the device cover — on the right side, there are two adjustment valves. Loosen the valve on the side with smaller bubbles by one turn and tighten the other side until both are even
- Test tube water levels are only at the marked line during A6 — water levels fluctuate during other steps, which is normal
- Normally, you only need to calibrate once — the device remembers the water level setting
- After calibration, observe whether the bubble volume is even on both sides. If one side has larger bubbles than the other, open the device cover — on the right side, there are two adjustment valves. Loosen the valve on the side with smaller bubbles by one turn and tighten the other side until both are even
💡 ✅ Hardware Installation Complete!How to verify correct installation:Check that during A6 (when air bubbles are running), both test tube water levels are at the marked line and bubbles are even on both sides!
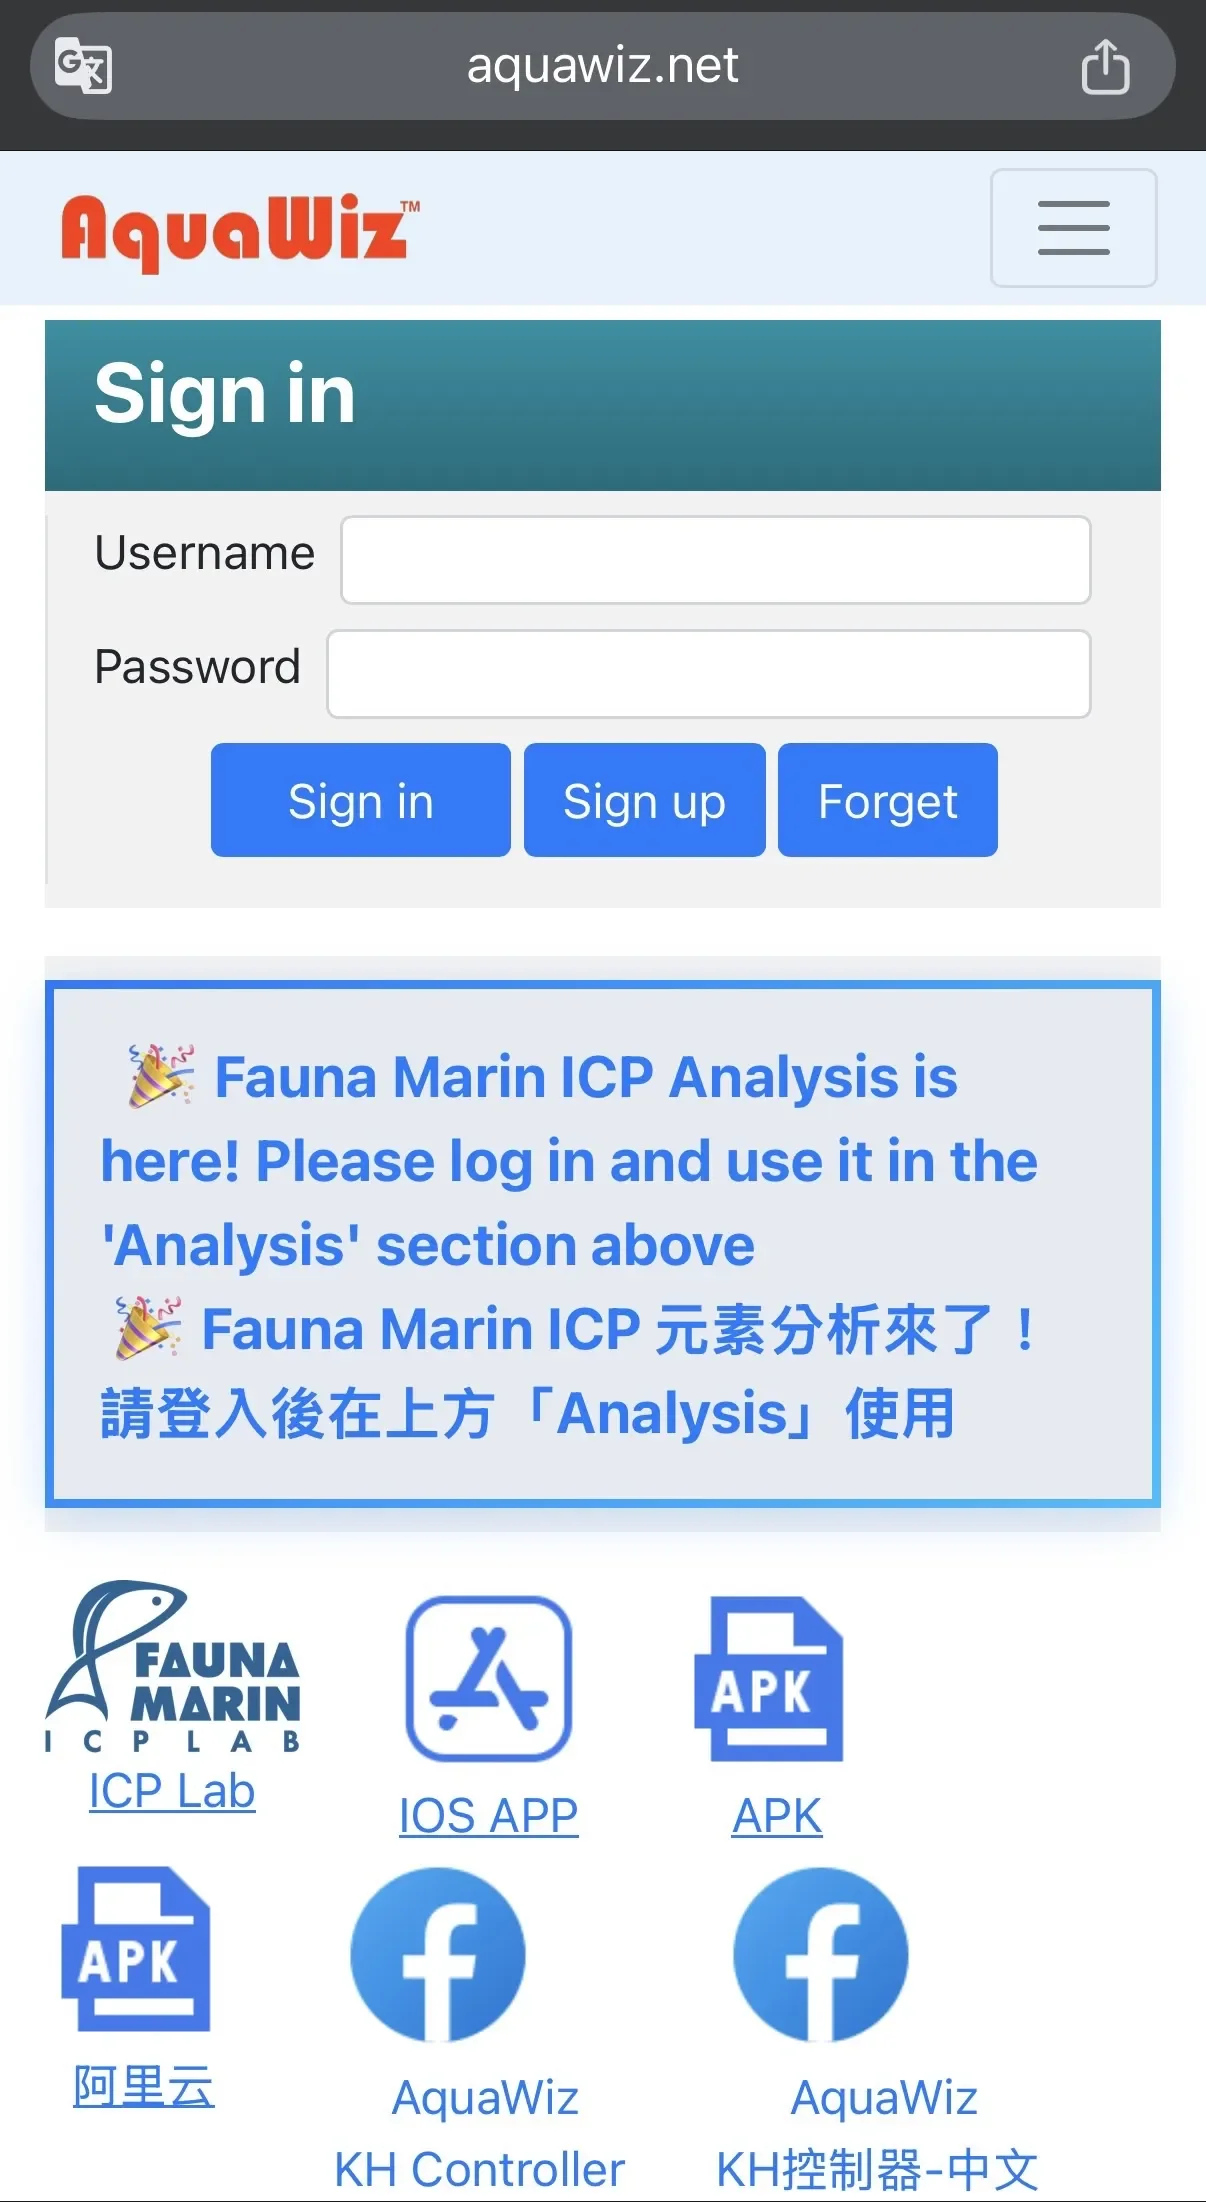
9. Website Registration & Initial Setup (Required)
iPhone Users:
Go to the App Store and search for "AquaWiz" to download.
Android Users:
Visit https://www.aquawiz.net/auth/en/login — at the bottom of the login page, you will find an APK download icon. Tap to download and install.

After downloading:
- Select "Register"
- Enter a username and password (password can be left empty for easier login)
- Enter the device serial number and activation code (found on the sticker on the back of the device)
- Enter your email address (the device will send alerts to this address)
- Click Register, then log in
There will be no data immediately after logging in — please wait for the device to complete its first measurement and upload, which takes approximately 1–2 hours 🙏
10. KH Measurement Calibration
Download KH Settings Immediately (Sync)
During any measurement step, press any key to enter the menu and select [Sync] to manually download settings from www.aquawiz.net immediately. Alternatively, settings are automatically downloaded every hour.
Screen Saver Mode
After 3 minutes of no button input, the LCD backlight turns off to extend its lifespan. Press any key to turn it back on.
When calibrating, you only need to measure the KH of your aquarium water — the device will automatically calculate the reference seawater KH.
When to calibrate:Initial setup: Wait for the KH controller to run for 1–2 days until KH readings stabilize before calibratingAfter replacing reference seawater, replacing the pH electrode, cleaning the air pump inlet with freshwater, replacing air stones, adjusting bubble volume, or adjusting test tube water levels — wait for KH to stabilize before calibratingOnly calibrate when aquarium KH is stable — calibrating while KH is rising or falling will produce inaccurate resultsKH measurement takes 20–40 minutes and reflects the aquarium KH from 20–40 minutes ago — keep this time lag in mind when using test kitsMost commercial KH test kits have an accuracy of ±0.3–0.6 — only calibrate if the difference exceeds 0.3 from the controller readingIf the actual KH differs from the target by more than 1.0, we recommend performing a water change to reach the target value, then recalibratingIf daily KH fluctuations exceed 1.0, the air bubble volume may be insufficient or air supply may be interrupted
- Initial setup: Wait for the KH controller to run for 1–2 days until KH readings stabilize before calibrating
- After replacing reference seawater, replacing the pH electrode, cleaning the air pump inlet with freshwater, replacing air stones, adjusting bubble volume, or adjusting test tube water levels — wait for KH to stabilize before calibrating
- Only calibrate when aquarium KH is stable — calibrating while KH is rising or falling will produce inaccurate results
- KH measurement takes 20–40 minutes and reflects the aquarium KH from 20–40 minutes ago — keep this time lag in mind when using test kits
- Most commercial KH test kits have an accuracy of ±0.3–0.6 — only calibrate if the difference exceeds 0.3 from the controller reading
- If the actual KH differs from the target by more than 1.0, we recommend performing a water change to reach the target value, then recalibrating
- If daily KH fluctuations exceed 1.0, the air bubble volume may be insufficient or air supply may be interrupted
KH Calibration Procedure
Calibration Timing
- After installation, let the device run for 24–48 hours before performing the first calibration
- After the first calibration, calibrate once per week for two consecutive weeks
- Afterwards, once per month is sufficient
- Do not calibrate daily — manual testing itself has a ±0.3 margin of error, and frequent calibration can make the reference value unstable
Calibration Steps
1️⃣ Manually Measure Aquarium KH
Use a Salifert or other test kit to measure the aquarium KH (e.g., measured result: 8.0 dKH)
2️⃣ Enter the Calibration Value
- Log in to the website (aquawiz.net) or the App
- Find the "Calibrate Now" field
- Enter the KH value you just measured
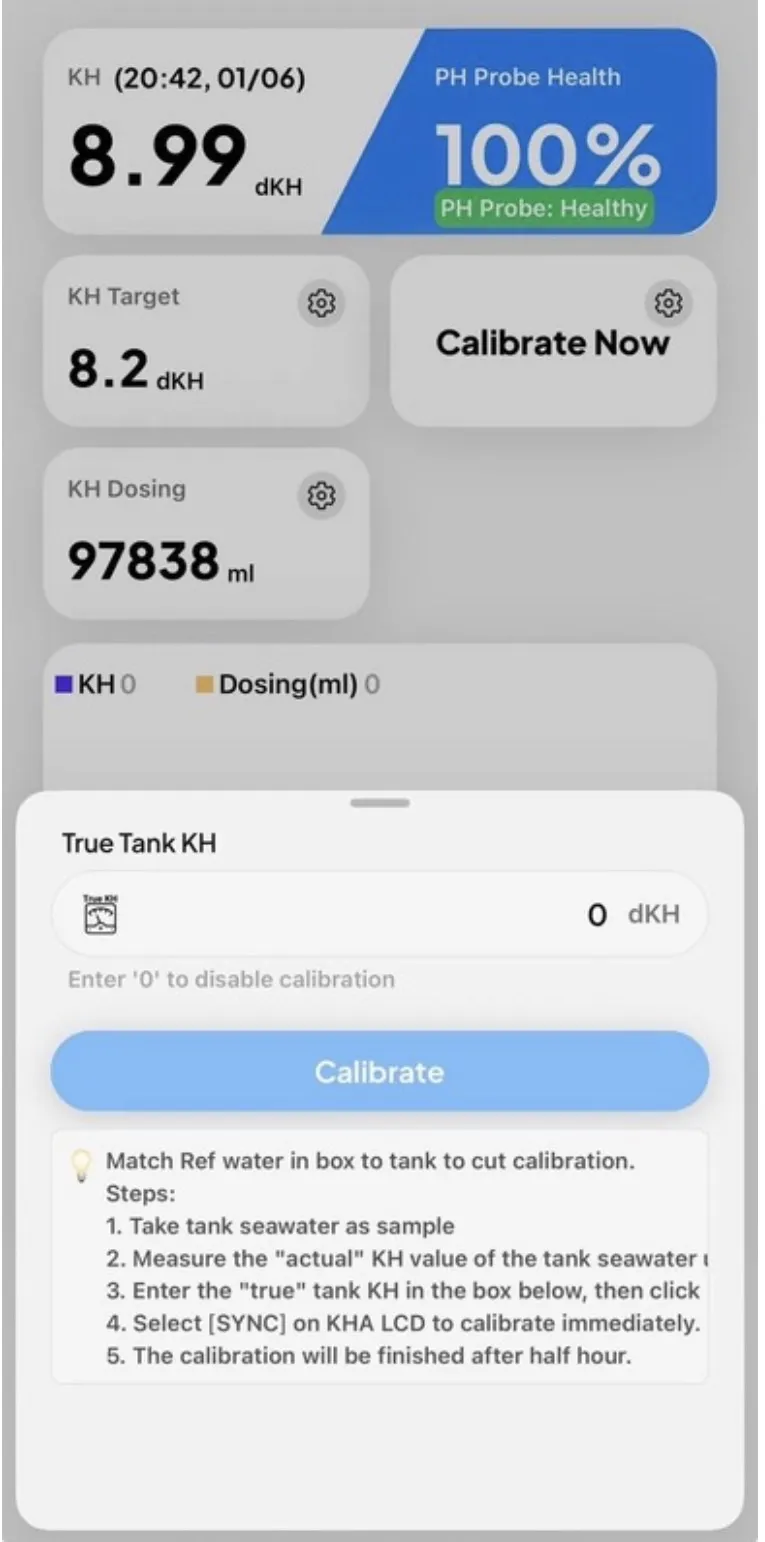
▲ AquaWiz App — KH Calibration Screen
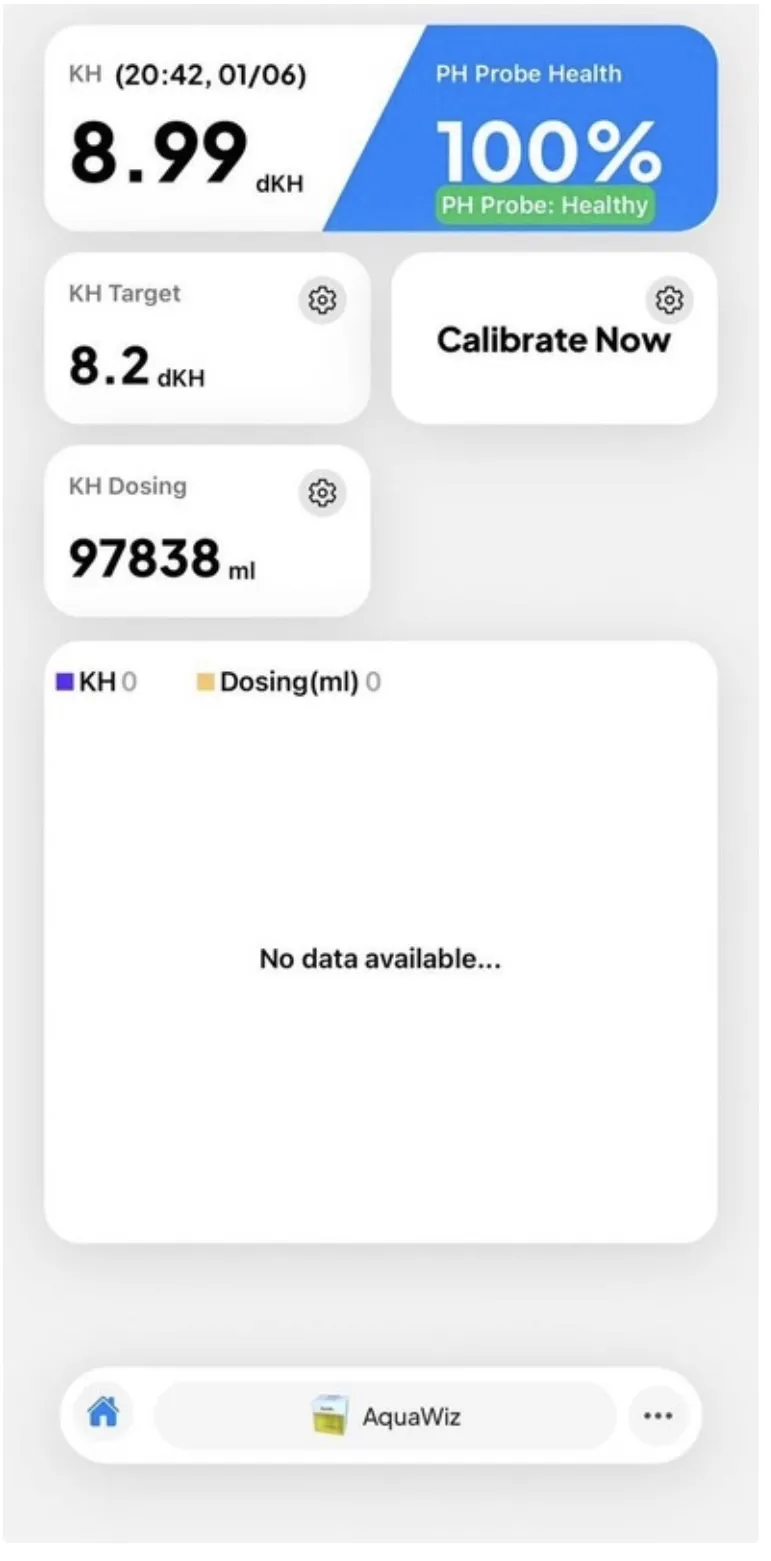
▲ AquaWiz App — Home Screen
3️⃣ Sync the Device
Two methods:
- Method 1:After entering the value on the website/App, simply wait — the device will automatically download the calibration settings after completing the next measurement and uploading data
- Method 2:For immediate effect, press Sync on the device's main screen — the device will immediately run a new test and apply the calibration value
Important Notes:Values before the first calibration are default simulated values — real measurements begin only after calibrationA calibration error within 0.3 is considered excellent (manual testing itself has a ±0.3 margin)If Ref KH deviates from the target by more than 0.5 dKH after calibration, observe first; if the deviation persists, replace the reference seawater
- Values before the first calibration are default simulated values — real measurements begin only after calibration
- A calibration error within 0.3 is considered excellent (manual testing itself has a ±0.3 margin)
- If Ref KH deviates from the target by more than 0.5 dKH after calibration, observe first; if the deviation persists, replace the reference seawater
🔧 ICP Auto-Calibration Guide (AquaWiz KHA)
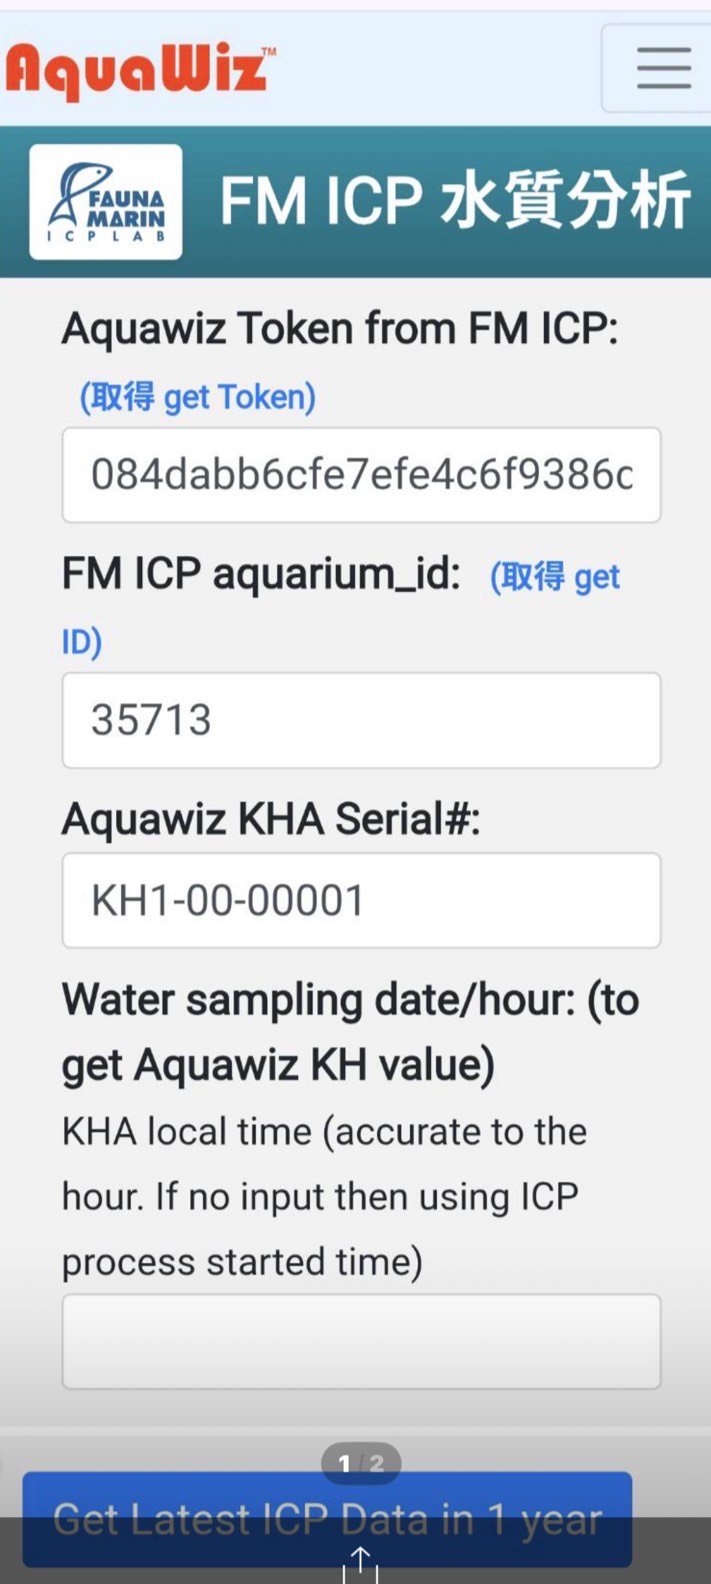
Follow these steps to complete ICP calibration:
📌 Step 1 — Obtain Fauna Marin ICP Data
You will need the following two pieces of information:
- Token(FM ICP Token)
- Aquarium ID(ICP aquarium_id)
👉 If you are unsure how to obtain these, click the blue "get" link next to each field for instructions.
📌 Step 2 — Enter Device Information
Enter your:
- AquaWiz KHA Serial Number
📌 Step 3 — Enter Sampling Time (Critical)
Enter:
- The actual time the ICP water sample was collected
⚠️ ⚠️ This time must be accurate (to the hour)The system uses this timestamp to match the corresponding KHA KH data at that exact time.
📌 Step 4 — Retrieve ICP Data
Once all information has been entered, click:
👉 "Get Latest ICP Data in 1 year"
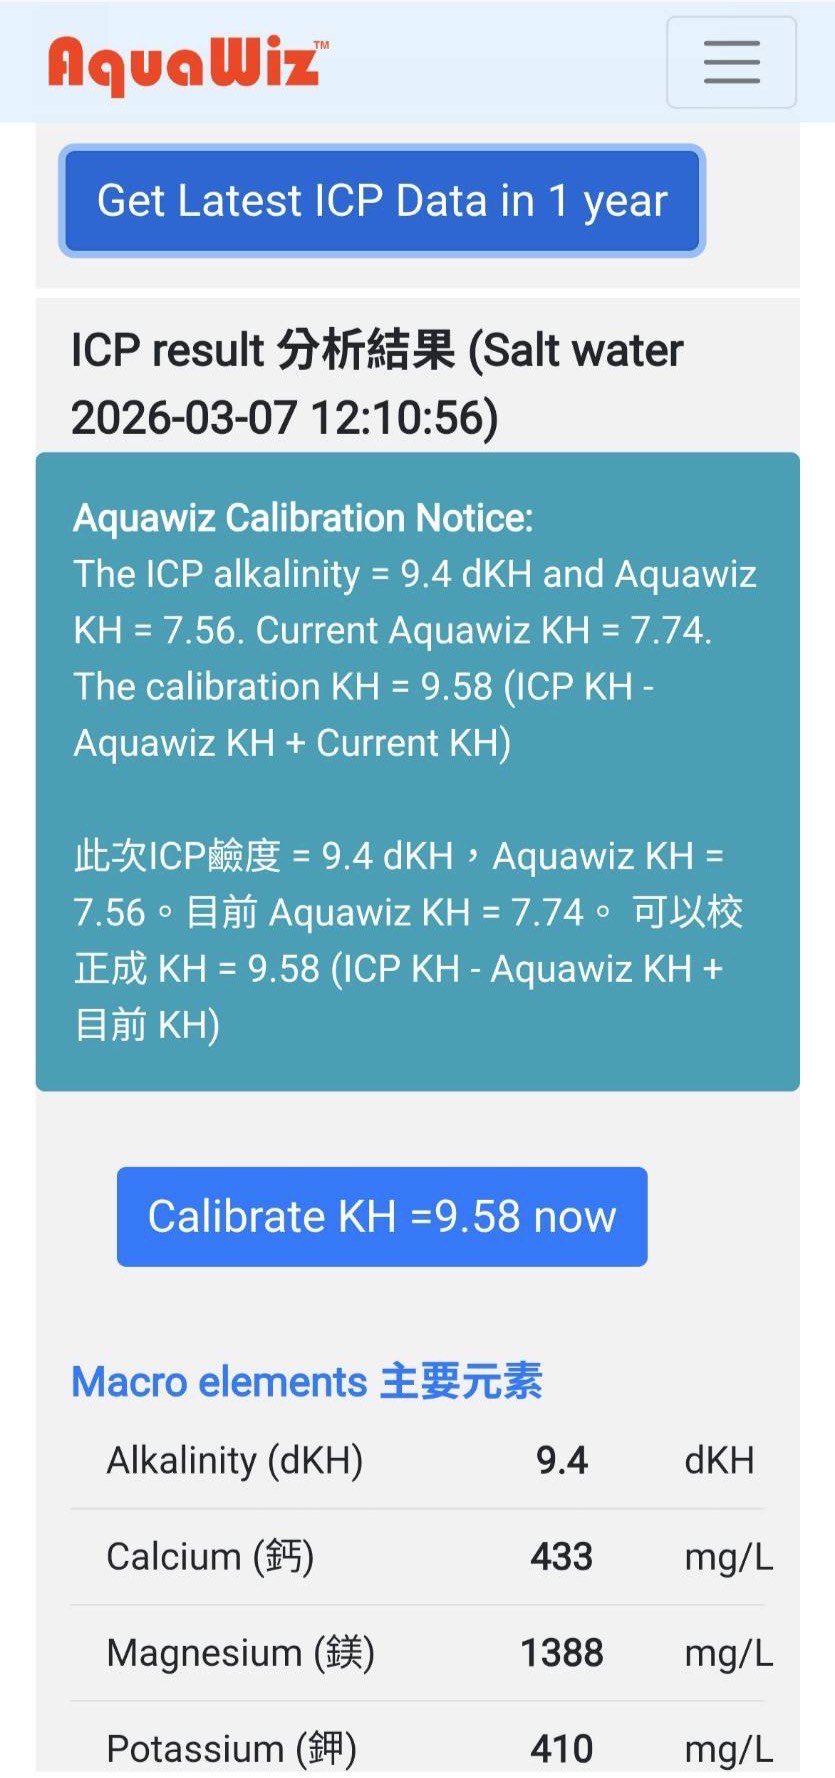
The system will:
- Automatically retrieve the most recent ICP test results
- Match them with the corresponding KHA KH data
📌 Step 5 — Automatic Calibration Calculation
The system will automatically calculate:
👉 Recommended Calibration KH value
📌 Step 6 — Complete Calibration
Simply click:
👉 "Calibrate"
The system will apply the KH calibration ✅
💡 💡 Additional Notes• The core principle of ICP calibration is aligning laboratory data with device data.• Accurate sampling time is the key to ensuring precision.
KH Chart Explanation
- pH: The current pH value of your aquarium
- pH(o): The pH value of your aquarium water after full aeration
- ΔpH: The upper pH limit achievable under current environmental air conditions — this is the optimization target for pH. It represents the maximum pH your aquarium water can reach when fully equilibrated with ambient air.
KH Settings
Sleep Time and Measurement Frequency
The test tubes and pH probe require several weeks to develop a hydrophilic surface before KH measurements become fully stable. For new devices, we recommend measuring once per hour with no sleep time to complete this process as quickly as possible. Once measurements stabilize, you can adjust to other intervals.
Example: Setting measurement every 6 hours will result in measurements at 0:00, 6:00, 12:00, 18:00, and 24:00.
Email Notifications
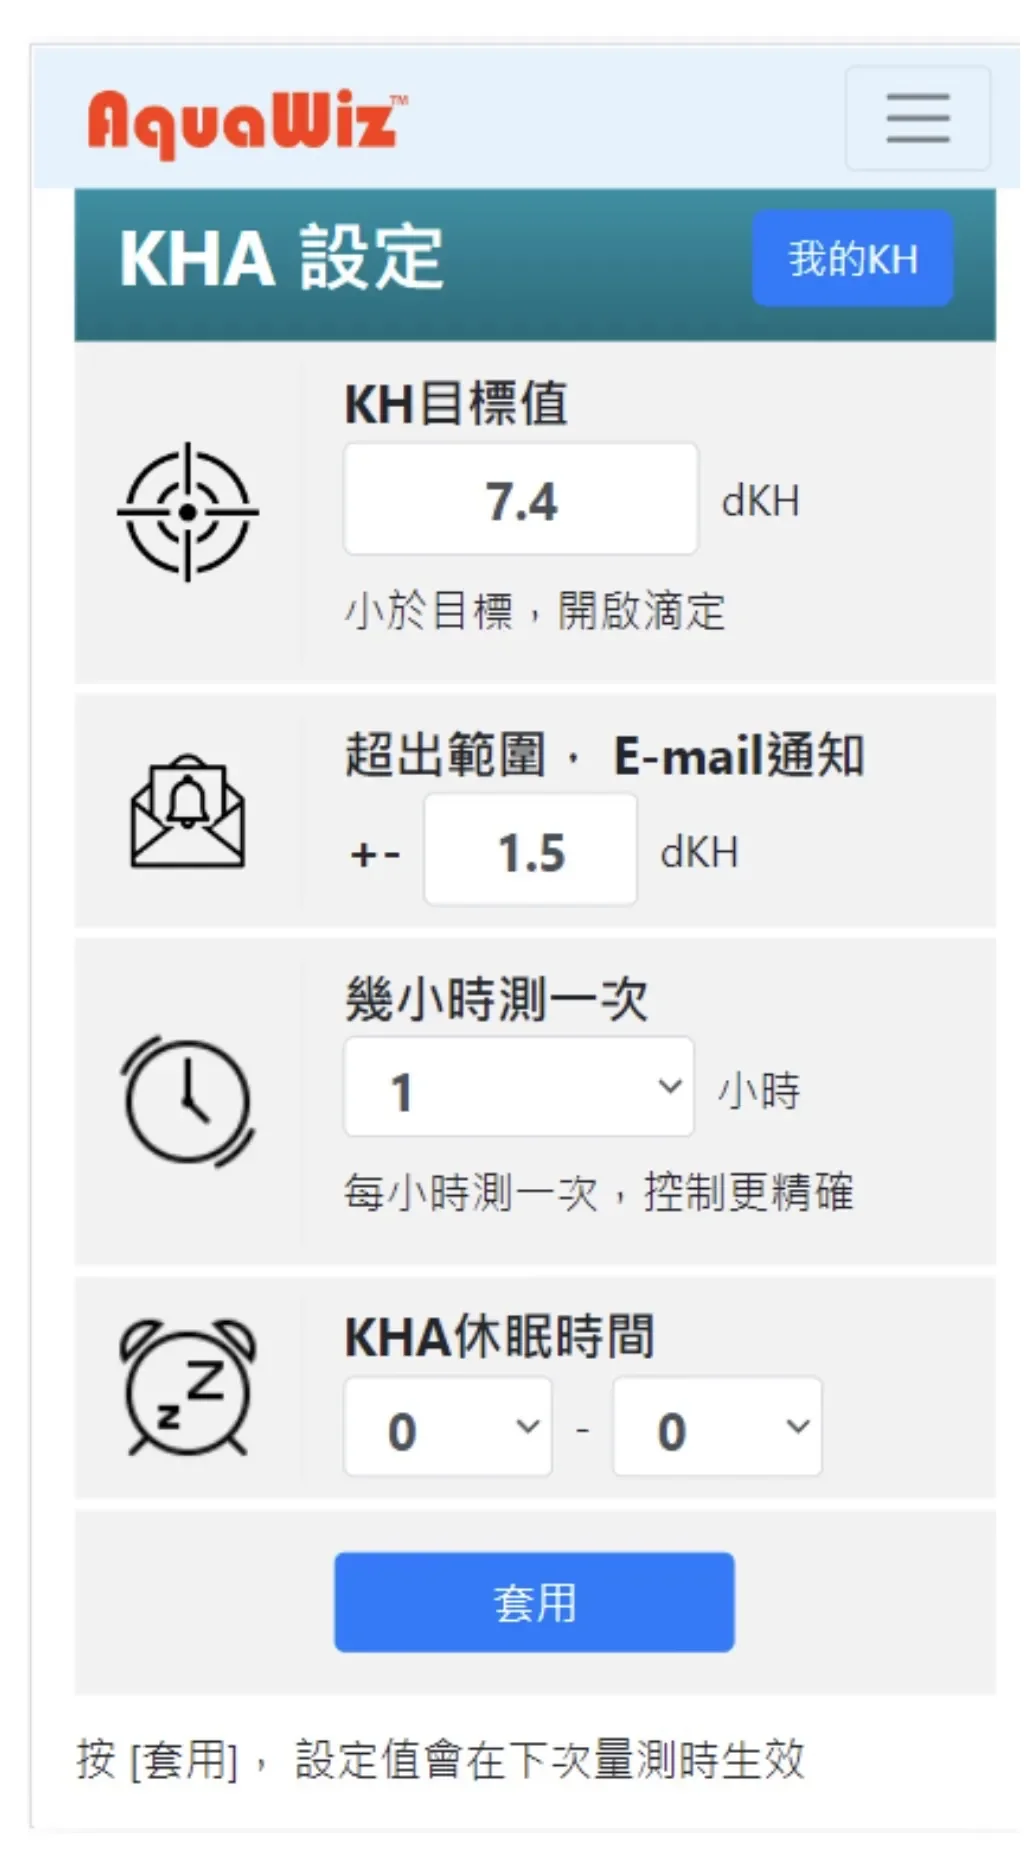
After setting up your email, notifications will be sent for:
- Email or password changes
- KH value exceeding the set range
- Dosing solution remaining below the set threshold
- pH electrode lifespan dropping below 50%
- Forgotten username or password
Reference Seawater Stability Management
The stability of the reference seawater is critically important, as it directly affects KH measurement accuracy. We recommend using aquarium water that has reached the target KH, natural seawater, or synthetic saltwater.
Since the same pH electrode is shared during measurements, small amounts of aquarium water will mix into the reference seawater, causing its KH to gradually approach the aquarium KH. If the difference exceeds 1.0 dKH over time, we recommend replacing the reference seawater and recalibratingIn cold climates, maintain a stable room temperature or place the KHA in a temperature-controlled cabinet (recommended: 25°C)The air circulation system uses an internal loop design with very low evaporation. If the reference seawater level changes by more than 1 cm within a week, check whether the two tubes inside the left test tube are touching the bottom — if not, push them down to the bottom
- Since the same pH electrode is shared during measurements, small amounts of aquarium water will mix into the reference seawater, causing its KH to gradually approach the aquarium KH. If the difference exceeds 1.0 dKH over time, we recommend replacing the reference seawater and recalibrating
- In cold climates, maintain a stable room temperature or place the KHA in a temperature-controlled cabinet (recommended: 25°C)
- The air circulation system uses an internal loop design with very low evaporation. If the reference seawater level changes by more than 1 cm within a week, check whether the two tubes inside the left test tube are touching the bottom — if not, push them down to the bottom
11. KH Dosing
When the measured aquarium KH falls below the target value, the built-in dosing pump activates to supplement KH — dosing precisely the amount needed (within the hourly maximum). No dosing occurs when KH is above the target.
Example:If 100 ml raises KH by 1 dKH and the hourly maximum is set to 10 ml: when the aquarium needs 1 dKH (requiring 100 ml), the device will only dose 10 ml per hour, supplementing 0.1 dKH per hour.
⚠️ This device has two dosing safety limits:1.Maximum dosing volume per hour: We recommend not exceeding the volume needed to raise KH by 0.1 dKH. Entering 0 disables the dosing function.2.Hourly dosing time is limited to 60 seconds maximum(approximately 60 ml) and cannot be changed.If your aquarium's hourly KH consumption exceeds 60 ml, we recommend adding a separate commercial dosing pump for base dosing, with the KHA supplementing only the remaining deficit.
Three Dosing Modes
This update introduces three selectable dosing modes:
1️⃣ Mode 1 (Default)— Dose as needed
The machine automatically supplements a small amount of dosing solution each hour based on the difference between the current measured value and the target value.
👉 If you wish to continue using this mode, no additional setup is required.
2️⃣ Mode 2 (Fixed Hourly Dosing)— Dose fixed ml
A fixed, pre-configured volume (ml) is dispensed every hour.
👉 Ideal for users who prefer a consistent dosing amount.
3️⃣ Mode 3 (Bolus — Once Daily)— Daily dose as needed
This mode delivers a single daily dose:
- Doses only once per day
- Still follows the "supplement only what's needed" logic
👉 How it works:
- Set your KH target value
- One hour before dosing, the machine calculates the KH deficit
- The full required amount is dispensed in one session
How to Access the New Feature
This feature is only available via the WiFi Setup Page:
- Open your phone's WiFi settings
- Connect to the machine's WiFi network
- Enter password:1234567890
- The setup page will appear automatically
- Scroll down to find "Dosing Mode"
- Select the desired mode and configure parameters
- Tap "Connect / Apply" to send settings to the machine
Bolus Dosing Configuration Guide
In the App's dosing settings page, two values need to be configured:
1️⃣ How many ml to raise 1 dKH
👉 Refer to your dosing solution's instructions for this calculation.
2️⃣ Maximum hourly dosing volume
👉 Recommendation: Set this value slightly above your daily consumption.
💡 📌 Example:If your daily KH consumption is approximately 1.4 dKH,👉 set the maximum volume to ≈ the ml equivalent of 1.6 dKH.This provides a buffer so the system can accommodate future increases in consumption.
⚠️ ⚠️ Important NoteThe values stated on your dosing solution's label may differ from the actual effect in your aquarium.If there is a discrepancy,recalculate based on actual test results.👉 Recommendation: Let the machine run for 2–3 days to determine the most accurate values.
⚠️ ⚠️ Installation Note (Siphon Prevention)Ensure that the dosing solution container is positionedlower than the aquariumto prevent siphoning.
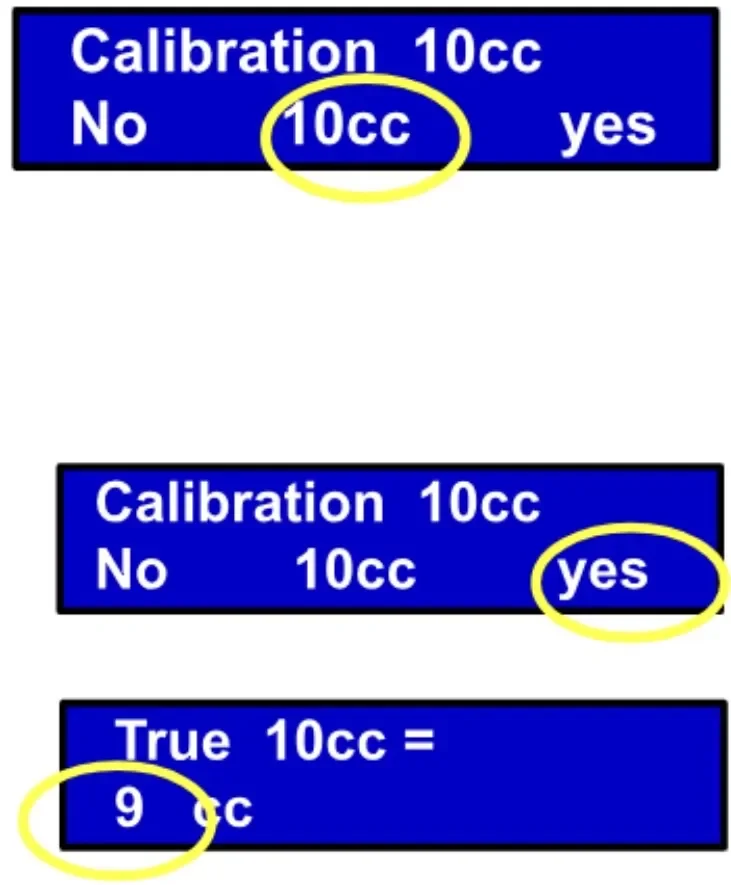
How to Check for Siphon Issues
- Navigate to the machine's main screen
- Select "Pump"
- Select "Calibration"
- Tap "10cc"
👉 How to determine:
- If waterstops flowingafter the test completes ➡️ No siphon issue
- If watercontinues flowing➡️ Siphon risk detected
Dosing Tubing Connection Steps
- For first-time use, we recommend substituting clear water for KH solution and routing the dosing outlet into an empty bottle. Run the system dry for a few hours to verify settings
- Connect tubing from the "Dosing Inlet" on the back right to the KH solution bottle
- Connect tubing from the "Dosing Outlet" to the sump or display tank
- Return to the main menu and select[Pump]to calibrate the dosing pump: Select[10cc]— the pump will dispense 10cc. Catch the water with a graduated cylinder. If the actual amount is 9cc, select[Yes]and enter 9cc to complete calibration
💡 Before setting up, calculate: how many ml of KH solution are needed to raise 1 dKH in your tank, then enter this value on the settings page.
This section covers how to calibrate the pH input (PH IN electrode) and pH output (KH2PH BNC) settings.
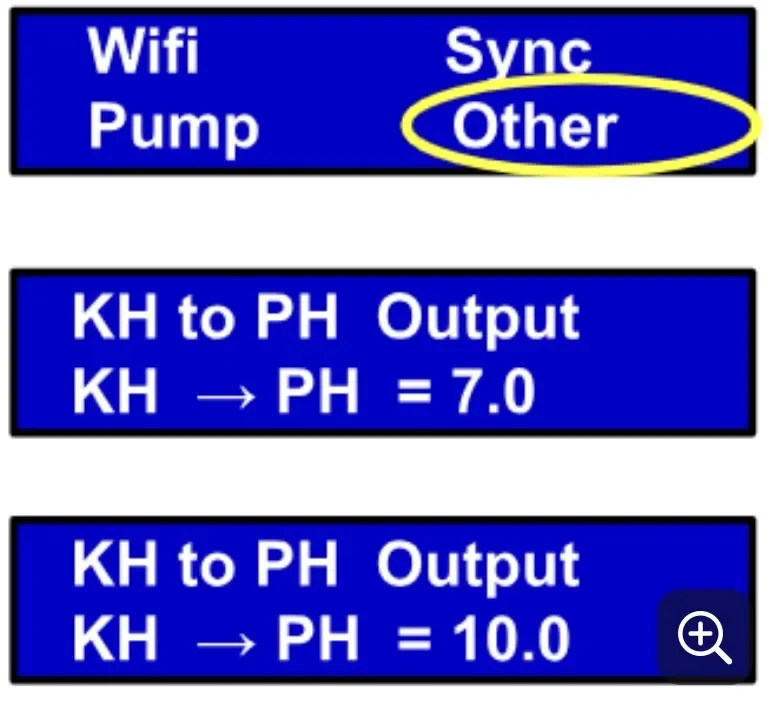
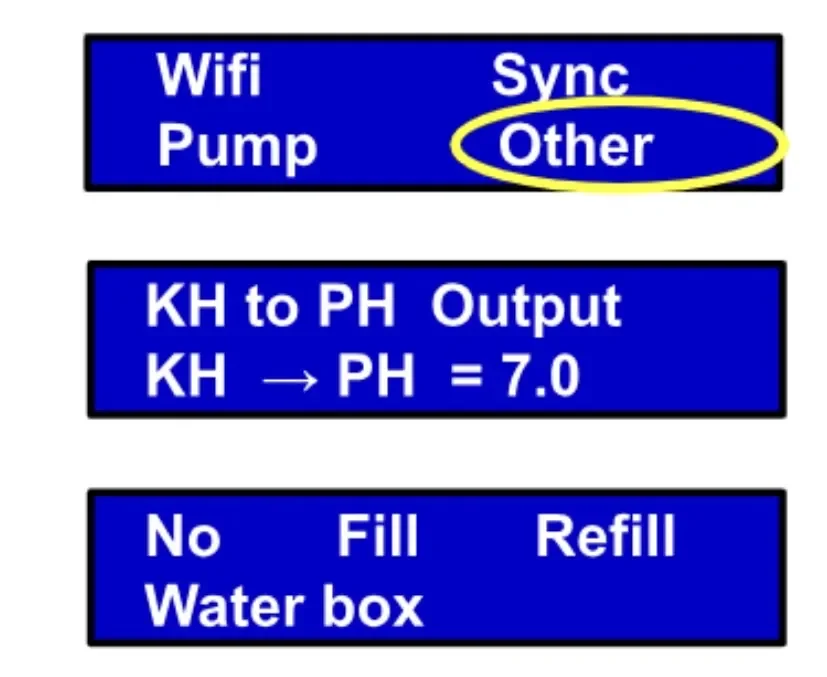
KH to pH Output (Other)
To display KH values on an Apex, eKoral, or pH monitor, you can use the KH to pH output function.
- Wiring: Use a dual-male BNC cable to connect the[KH to PH]BNC socket to the pH monitor's BNC socket
- Calibrate the pH Monitor: From the main menu, select[Other]. When outputting 7.0, calibrate the pH monitor to 7.0; press the right button to output 10.0, then calibrate to 10.0. You can repeat the left/right calibration. Once complete, the pH monitor will directly display KH values (e.g., KH = 7.61 shows as 7.61)
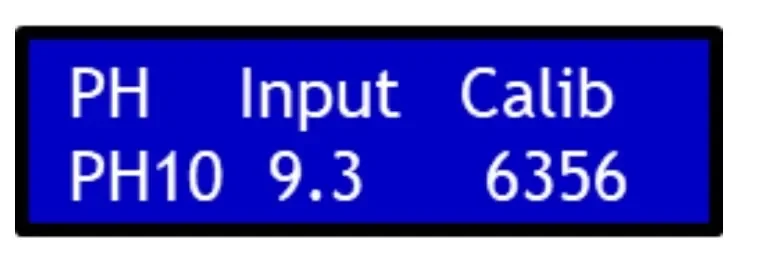
pH Input Calibration (Other)
If you find pH readings are inaccurate, please note: the device ships with factory-default pH values. Some users only care about relative pH changes (e.g., day/night fluctuations) and may not need to calibrate.
However, if you require accurate absolute pH values, periodic calibration is recommended. Rest assured, pH calibration does not affect KH measurement results.
Two pH calibration methods are available:
Method 1: Built-in Manufacturer Calibration (pH Buffer Solution)
Reference video: https://youtube.com/shorts/Xo5aqd9WdrE
Required Materials:
- pH 7 calibration solution
- pH 9.18 or pH 10 calibration solution (either one is fine)
- A cup of purified water
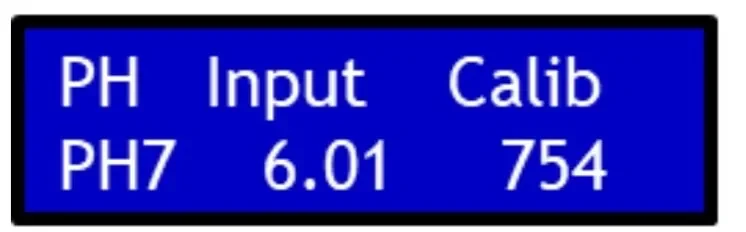
Calibration Steps:

- On the main screen, select "Other"
- Press Enter once
- Select "pH" → "Input Calibration"
First, calibrate pH 7:
- Place the pH probe into the pH 7 calibration solution
- Ignore the value displayed in the center of the screen
- Watch the rightmost value
When the rightmost value changes very slowly (like a clock's second hand moving gradually), calibration is complete — press Enter at this point.
Next, calibrate pH 9.18 or pH 10:
- Remove the pH probe from the pH 7 solution
- Rinse in purified water
- Gently shake dry
- Place into the pH 9.18 or pH 10 calibration solution
- Complete calibration following the same method
Method 2: Absolute pH Value Calibration (New System Feature)
Steps:
- Open your phone's WiFi settings
- Connect to the device's SSID (device signal)
- Enter password: 1234567890
- Open the device configuration page
Scroll down and you will see two new features:
1️⃣ pH Reset
If you accidentally miscalibrate and pH values become severely abnormal, use this function to restore factory defaults.
2️⃣ pH Offset
This function allows you to correct pH using a manually measured absolute value.
Example: If you manually measure your aquarium pH as 8.0, but the device's latest reading shows 7.8, simply enter +0.2 in the "pH Offset" field to complete the calibration.
Water Chamber Fill & Water Change (Other)
- From the main menu, select[Other], press[Enter]to skip KH to pH calibration, then enter the water chamber function menu
- [Fill]: Fill the water chamber once — filling from empty to the marked level takes approximately 20 minutes
- [Refill]: Replace the reference seawater (drains all water first, then draws in aquarium water) — takes approximately 40 minutes total
During normal KH measurements, the water level automatically adjusts to the marked line — no manual adding or draining is needed.
13. KH Measurement Principle
The AquaWiz KH Controller fundamentally works by comparing the difference between reference seawater and aquarium water to calculate the KH value. CO₂ content in the water or ambient air only affects absolute readings, not the relative difference.
⚠️ Do not blow air toward the device during measurements! This will cause an imbalance between the two sides and severely affect results.
14. Measurement Procedure Steps
After measurement begins, the screen displays each step in sequence. After a power interruption, the device automatically restarts measurement from step A2.
| Step | Time (approx.) | Description |
|---|
| A2–A5 | xx:00 | Drain and draw aquarium water or reference water into the right and left test tubes; after draining, air bubbles are expelled. If the water level is not at the marked line, adjust during A6. |
| A6 | xx:03 | Air bubbles for 15 minutes. When re-measuring, the upper right corner displays [Rep] |
| A7 | xx:18 | Drain reference water |
| A8 | — | Transfer aquarium water to the left side |
| A9 | xx:20 | Measure KH value. Re-measures if difference from last reading exceeds 0.1. After confirmation, dosing activates (displays [Dos 0.1] = supplementing 0.1 dKH) |
| A10 | — | Stop air bubbles, transfer aquarium water to the right side |
| A11 | — | Draw in reference water |
| A12 | — | Wait to upload measurement data. After KH data is uploaded, download website settings. Water level can be adjusted during this step. |
| A13 | — | Upload complete, wait for the next hour, then repeat from A2. Water level can be adjusted during this step. |
15. Cleaning & Maintenance
1. Test Tube & Water Chamber Cleaning (Recommended Every 6 Months)
Deep Cleaning:
- Carefully remove the pH probe and set it aside
- Pour out the water from the chamber
- Pour citric acid solution into the chamber and test tubes, soak for 10 minutes
- Brush the chamber and test tubes, then pour out
- Pour purified water into the chamber and test tubes, then pour out (to remove residual citric acid)
Quick Cleaning:
- Brush the chamber and test tubes directly, then pour out
- Rinse with purified water, then pour out
2. Air Pump Cleaning (Recommended Every 6 Months)
Smaller bubbles typically appear after about 6 months of use — cleaning restores normal operation.
Step 1: Locate the Air Inlet Tube
Identify your device version:
- Older version(serial numbers in the 1000s): Air inlet tube is between the 3rd and 4th motors
- Newer generation: Air inlet tube extends outside the device — you can see a clear tube near the dosing connectors
Step 2: Prepare Materials
- Prepare a cup of purified water
- Prepare a length of tubing (you can use the device's water tube or a dosing tube)
- Connect the air inlet tube to this extension tube and place it in the purified water cup
Step 3: Prepare the Air Outlet Tubes
Open the top cover, remove the air outlet tubes from both test tubes and hang them on the outside of the device. Remove the air stone from one of the outlet tubes.
Step 4: Perform Cleaning
- Unplug the power and plug it back in
- Wait approximately 3 minutes for the device to enter step A6
- The air inlet begins drawing water; the outlet tube without the air stone begins draining water
- Let water flow for approximately 1 minute to complete cleaning
Step 5: Restore the Device
- Return the air inlet tube to its original position
- Place the air outlet tubes back into the left and right test tubes
💡 Approximately 1 hour after cleaning, we recommend performing a KH calibration.Reference video:https://youtu.be/Th9mVaXb6sM
3. Other Periodic Maintenance Items
| Item | Recommended Frequency |
|---|
| KH Calibration | At least once per month |
| Reference Seawater Replacement (Refill) | Approximately every 6 months |
| pH Probe Replacement | Approximately every 6 months |
| Motor Lifespan | Approximately 1–1.5 years |
We recommend replacing the pH probe every 6 months.
16. Troubleshooting
1. Basic Inspection
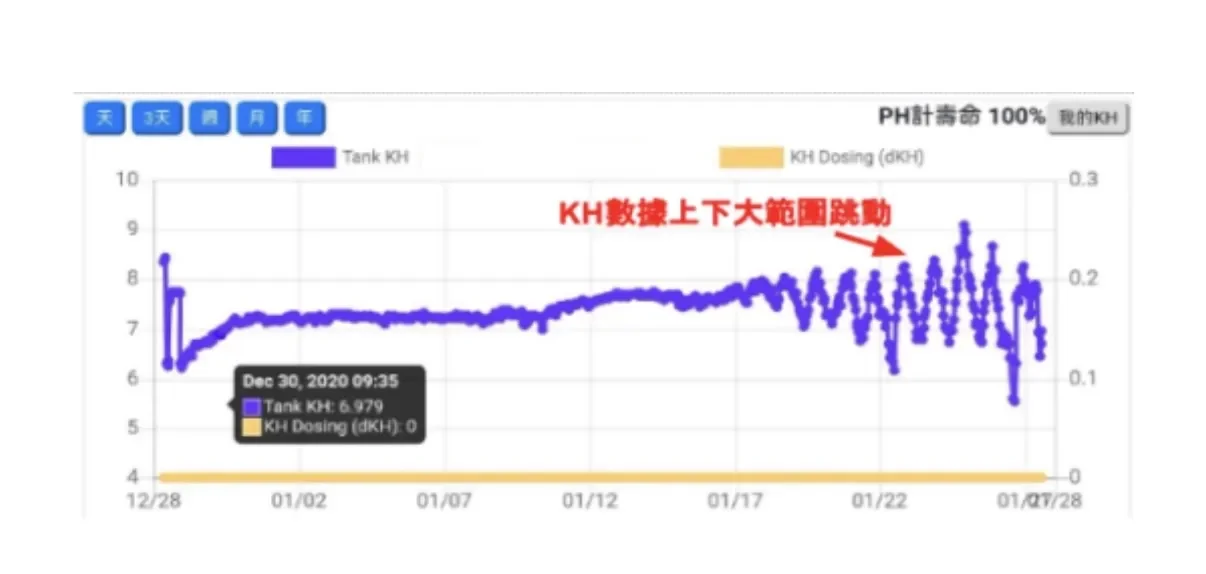
After the hourly water draw, before the 20-minute mark when the screen displays [A6], check the water level and bubble height in both test tubes. No bubbles or too few bubbles will cause inaccurate measurements and large KH fluctuations.
2. pH Electrode Needs Replacement
When the website shows pH lifespan at 0% or Fail, the electrode has aged and needs replacement.
If electrode lifespan is shorter than expected, check:
- The KH controller's water inlet tube should be placed upstream of the KH/Ca/Mg dosing outlets to avoid drawing in high-concentration solutions
- When KH ≥ 10 and magnesium is insufficient (Mg < 1400), calcium easily precipitates onto the pH electrode, shortening its lifespan
3. KH Values Unstable or Inaccurate (Measurement Error Exceeding 0.2 dKH)
- The vast majority of cases (90%): Too few bubbles or no bubbles in one test tube, causing large measurement fluctuations
- Peristaltic motor failure: Causes insensitivity to KH changes — values appear stable but barely change. Replug the power and observe whether the three right-side motors rotate forward and backward correctly
- pH probe failure: Symptoms similar to motor failure — values stable but barely changing
- Test tube water level suddenly rises or drops by more than 1 cm: Check for leaks or whether the air inlet is drawing reference seawater
- pH electrode BNC plug not fully screwed in
- Aquarium water tube displaced after water change, unable to draw water
- Abnormal reference seawater level: Check whether both tubes inside the left test tube reach the bottom
4. Air Pump Bubble Volume Decreasing
Smaller bubbles typically appear after about 6 months — cleaning restores normal operation. For detailed cleaning steps, see 14. Cleaning & Maintenance — 2. Air Pump Cleaning.
5. Air Stone Clogged by Contamination
Under normal use, air stone lifespan exceeds 2 years. If bubble volume remains low after cleaning the air pump, remove the air stone and check:
- If air flows from the outlet tube → the air stone is clogged. Clean with water, detergent, or hydrochloric acid, or replace directly
- If no air flows from the outlet tube → the air pump itself is faulty. Please send for repair
6. Controller Clock Inaccurate / No Latest Reading on Website
- After KH measurement completes, data is uploaded at the top of the hour and settings are checked. No connection means data is lost
- After pressing[Sync]— a few dots on screen = successful connection and upload
- After pressing[Sync]with setting changes — many dots on screen = successful upload and download
- [Wifi Fail !]: WiFi not connected — please reconfigure WiFi
- [AP Fail !]: Device cannot connect to the router — reconfigure WiFi or improve signal strength
- [WWW Fail !]: Connected to router but cannot reach the server — usually a network congestion issue. Contact your ISP
7. Water Chamber or Test Tube Water Level Too Low or Too High
Step 1: Restart and Verify All Motors Are Rotating Normally and in the Correct Direction
Unplug the power and plug it back in. After restarting, observe the back of the device — it will automatically self-test the motors. The first three motors rotate forward once and backward once; the dosing motor only rotates once. The direction of the first three motors should be consistent.
Verify that the first three motors rotate forward and backward:
- If a motor doesn't rotate → motor may be faulty. Contact customer support for replacement
- If rotation is normal → proceed to the next step
Check whether any motor rotates in the wrong direction:
- One motor is reversed→ This is usually the cause! Simply swap the two tubes on that motor to resolve the issue
- All three rotate correctly→ The next two steps (clear tubes + acrylic cover plate) usually resolve the issue
Step 2: Check the Clear Tubes in the Test Tubes
Verify that the clear tubes inside both test tubes are fully pressed down to the bottom. If not, push them to the bottom and observe.
Step 3: Check the Acrylic Cover Plate in the Motor Area
The motor tubing may be pinched by the acrylic cover plate, affecting water flow. To check:
- Open the device cover
- Remove the acrylic cover plate from the motor area
- Close the device cover (without reinstalling the acrylic plate for now)
Observation
After completing the above checks, set the water chamber level to approximately 5mm below the marked line, then observe for one day to see if the level returns to normal 🙏
If the issue persists after completing all steps above, the internal float switch status may be abnormal. Please contact customer support for a remote check of the float switch status.
17. Specifications
| Power Supply | Input AC 100V–240V, 50–60Hz; Output DC 12V 1A, 5.5mm plug |
| pH Electrode | BNC connector, aquarium or industrial pH electrode |
| KH Precision | ±0.05 KH |
| KH to pH Output Error | ±0.01 pH |
| Peristaltic Tubing Size | Inner/Outer Diameter: 3mm / 5mm |
| Reference Seawater Capacity | 0.6 liters |
| Device Dimensions | 180 × 140 × 190 mm |
| Unit Conversion | 1 dKH = 17.887 ppm = 0.357 meq/L |
AquaWiz combines hardware and software R&D with cloud computing to develop carbonate hardness (KH) measurement technology, making saltwater coral keeping easier.
Contact: aquawiz.kh@gmail.com
AquaWiz Smart Support System
Need Help? Start Here.
Step 1 — Quick Check
Before contacting support, identify your issue:
- Unable to connect to Wi-Fi
- KH readings seem abnormal
- Weak or no bubbles
- Dosing not working properly
Step 2 — Use the AquaWiz AI Assistant
Scan the QR code or visit the link below. Our AI Assistant can guide you step-by-step and solve most issues instantly.
[ QR code / link area ]
To get the best result: describe your issue clearly and include your device serial number (e.g. KH1-00-XXXXX).
How to Ask the AI (Examples):
- "I just installed my device, what should I do step by step?"
- "How do I calibrate pH correctly?"
- "What maintenance should I do regularly?"
- "My KH readings look abnormal, here is my serial number: KH1-00-XXXXX"
💡 Tip: The more details you provide, the more accurate the answer will be.
Step 3 — Contact Your Local Distributor
If the issue cannot be resolved, please contact your local distributor for further assistance. Most issues can be resolved through the AquaWiz AI Assistant.
⚠️ Important — Do NOT disassemble the device before contacting support. Always follow official guidance to avoid damage.